

You can lock an iPad to one website by using iPad kiosk mode through Guided Access, Apple Configurator, or an MDM solution. For business use, MDM is the most reliable option because it lets IT teams remotely restrict the iPad to a single website, control browser access, prevent users from exiting the page, and manage multiple kiosk iPads from a central dashboard.
Key Takeaways
Locking an iPad to one website transforms it into a secure kiosk, ensuring focused usage, improved customer experience, and stronger data protection.
- What It Means: Locking an iPad to one website restricts device access to a single URL, preventing users from switching apps, changing settings, or accessing unauthorized content.
- Why It Matters: Unrestricted iPads in public or work environments can lead to misuse, data exposure, and distractions, making kiosk lockdown essential for secure and controlled usage.
- How It Works: Using kiosk software, IT admins can whitelist specific websites, run them in full-screen mode, and block navigation controls to ensure a seamless, single-purpose experience.
- Use Case Fit: Common use cases include retail kiosks, self-check-in systems, digital menus, training portals, and event registration, where focused interaction and limited access are critical.
- Business Benefits: Website lockdown improves security, enhances user experience, reduces device misuse, and ensures consistent performance across customer-facing and employee-facing iPad deployments.
This guide explains the different methods to lock an iPad to a single website, their limitations, and how to deploy website kiosks efficiently from business to educational environments.
Can you lock an iPad to one website?
Yes. An iPad can be restricted to a single website using several methods, each designed for different use cases.
For individual devices, built-in iPadOS features such as Screen Time and Guided Access provide basic website or app restrictions without requiring additional management tools. For business, education, and shared-device deployments, iOS MDM offers a more scalable approach. It allows IT admins to configure website kiosks, apply policies remotely, and manage multiple devices from a central dashboard.
Read More: How to Lockdown an iPad to Single App Kiosk Mode
What are the key differences among all the methods?
Each method discussed in this guide addresses a different deployment requirement. Some are suitable for temporary restrictions on a single iPad, while others are designed for centrally managed kiosk deployments across an organization.
| Method | Best for | Requires MDM? | Fleet scalable? | Primary limitation |
|---|---|---|---|---|
| Screen Time | Personal website restrictions | No | No | Restricts website access but doesn’t create a dedicated kiosk experience. |
| Guided Access | Temporary single-device sessions | No | No | Must be enabled and exited locally on each device. |
| Apple Configurator + Supervision | Preparing supervised iPads | No | Limited | Manual setup using a Mac; not practical for large deployments. |
| Network-Level DNS Filtering | Restricting website access across a network | No | Yes (network dependent) | Doesn’t prevent users from leaving Safari or opening other apps. |
| Single App Mode via MDM | Dedicated website kiosks | Yes | Yes | Requires supervised, enrolled devices. |
| Web Clips via MDM | Quick access to approved websites | Yes | Yes | Best suited when combined with kiosk policies for dedicated website deployments. |
Methods to lock an iPad to one website
Method 1: Apple Screen Time
Apple’s Screen Time includes web content restrictions that allow you to limit which websites can be accessed through Safari. One of its options, Only Approved Websites, lets you specify an approved list of websites while blocking all others.
How to configure it
- Open Settings on the iPad.
- Navigate to Screen Time and enable it if it’s not already active.
- Open Content & Privacy Restrictions and then turn on Content & Privacy Restrictions.
- Go to App Store, Media, Web, & Games, then tap Web Content.
- Select Limit Adult Websites, and then tap Add Website below Never Allow.
- Enter the URLs of the websites you want to block.
Once configured, Safari only allows approved websites while blocking all other unapproved websites.
Best suited for
- Personal iPads
- Parent-managed devices
- Small educational environments
- Basic website restrictions without additional management tools
Limitations
Although Screen Time restricts website access, users can still interact with Safari.
Method 2: Guided Access
Guided Access is an accessibility feature in iPadOS that temporarily restricts the device to a single app. If the approved website is open in Safari, Guided Access can keep users within that browsing session until an authorized person exits the session using a passcode, Face ID, or Touch ID.
Unlike Screen Time, Guided Access focuses on restricting access to the current app rather than filtering web content.
How to configure it
Before starting a Guided Access session, enable Guided Access from the Settings app and configure how the session can be ended using a passcode, Face ID, or Touch ID. You can also configure optional preferences such as Time Limits, Accessibility Shortcut availability, and Display Auto-Lock based on your deployment requirements.
- Open Safari and navigate to the website you want users to access.
- Start Guided Access using Siri, Control Center (if enabled), or the Accessibility Shortcut.
- If required, circle areas of the screen you want to disable.
- Configure the session settings, such as the Top Button, Volume Buttons, Motion, Software Keyboard, Touch, and Time Limit.
- Tap Start to begin the Guided Access session.
Important considerations
- The steps may vary with the iPadOS version.
- Guided Access restricts users to Safari. It doesn’t automatically prevent navigation within the currently open website or visiting other links if available.
- To prevent users from entering a different URL, disable interaction with the address bar before starting the session.
Best suited for
- Classroom activities
- Product demonstrations
- Temporary kiosk sessions
- Individual devices under local supervision
Limitations
Guided Access is intended for temporary use on individual devices. It cannot be enabled remotely and requires someone with physical access to configure or exit the session.
Method 3: Apple Configurator and Supervision
Apple Configurator is Apple’s macOS application for preparing and configuring Apple devices. It can place iPads into Supervised mode, unlocking additional management capabilities that aren’t available on unsupervised devices.
Unlike Guided Access, configurations applied through Apple Configurator persist across device restarts. However, preparing an iPad for supervision requires access to a Mac.
Before you begin
- Back up any important data before preparing the device. Preparing an iPad in Supervised Mode using Apple Configurator performs a factory reset.
- Disable Find My iPad, as Activation Lock prevents Apple Configurator from supervising the device.
- Prepare the iPad as a supervised device. Supervision is required for Single App Mode.
How to lock a supervised iPad to one website
First, prepare the iPad for supervision using Apple Configurator:
- Open Apple Configurator on your Mac and connect the iPad.
- Select the iPad and choose Prepare.
- Select Manual Configuration.
- Select Supervise devices.
- Choose whether to enroll the device in a device management service. If you’re managing the iPad directly through Apple Configurator, you can choose not to enroll it in MDM.
- Select an existing organization or create a new one.
- Configure which Setup Assistant screens should appear after preparation.
- Follow the prompts to authenticate and complete the preparation process.
Once the iPad is supervised, create a configuration profile containing the website you want to deploy:
- In Apple Configurator, choose File > New Profile.
- Enter a name for the profile in the General section.
- Select Web Clips from the sidebar and choose Configure.
- Enter the Web Clip Label and URL, then enable Full Screen if you want the website to open without Safari’s standard browser controls.
- Save the configuration profile.
- Select the supervised iPad in Apple Configurator and choose Add > Profiles.
- Select the saved configuration profile to install the Web Clip on the iPad.
A Web Clip provides a Home Screen shortcut to the specified website. When configured for full-screen display, the linked page can appear as a full-screen web app.
Lock the iPad to the website
After installing the Web Clip, use Single App Mode to restrict the supervised iPad to that Web Clip:
- Select the iPad in Apple Configurator.
- Choose Actions > Advanced > Start Single App Mode. You can also Control-click the device and select Advanced > Start Single App Mode.
- Select the Web Clip you created from the available apps.
- Choose Options if you need to configure additional Single App Mode settings.
- Select Select App to apply the configuration.
Apple Configurator’s Single App Mode forces the selected app to open and prevents access to other apps. The selected app also reopens after the device restarts.
How to exit Single App Mode
To remove the kiosk restriction:
- Connect the iPad to the Mac running Apple Configurator.
- Select the iPad.
- Choose Actions > Advanced > Stop Single App Mode.
Best suited for
- Organizations preparing a small number of corporate-owned iPads
- Testing kiosk deployments before rolling them out at scale
- Environments where Apple Business Manager isn’t available
Limitations
- Requires a Mac running Apple Configurator.
- Preparing the device erases all existing data.
- Each iPad must be prepared individually, making the process less practical for large deployments.
Method 4: Network-level website filtering
When multiple devices connect to the same managed network, restricting website access at the network level can be more efficient than configuring each iPad individually. Instead of applying website restrictions on every device, administrators define access rules on the network infrastructure, and those rules apply to all connected devices.
Common approaches
Organizations typically implement network-level website filtering using:
- Router- or firewall-based filtering: Inspects network traffic and allows or blocks requests based on predefined rules.
- DNS filtering: Prevents access to restricted domains by allowing DNS resolution only for approved websites.
How it works
When a user attempts to access a website, the network checks whether the requested domain is permitted.
- Approved domains resolve normally and load as expected.
- Restricted domains fail to resolve or display a block page, depending on the filtering solution.
For example, an organization can allow access to and prevent access to all other websites.
- learning.school.edu
- exam.school.edu
Best suited for
- Schools and educational institutions
- Libraries
- Shared public terminals
- Guest Wi-Fi networks
- BYOD environments with limited device management
Limitations
- Website restrictions apply only when the device is connected to the managed network.
- This method doesn’t convert an iPad into a website kiosk.
- Users can still exit Safari, open other applications, or access device settings unless additional device restrictions are applied.

Method 5: iOS MDM
When multiple iPads need to display the same website, configuring each device manually quickly becomes inefficient. iOS Mobile Device Management (MDM) enables IT admins to configure website kiosks remotely, apply policies consistently, and update devices without requiring physical access.
Using an MDM solution such as Scalefusion, administrators can:
- Deploy website kiosks remotely.
- Publish kiosk configurations to multiple devices.
- Restrict device functionality based on the deployment scenario.
- Update website URLs without manually reconfiguring each iPad.
- Roll out configuration changes to device groups from a central dashboard.
For business and education deployments, this provides a repeatable and scalable approach compared to configuring every device individually.
Option A: Deploy a website kiosk using Single App Mode
Single App Mode restricts an iPad to a single application. For website kiosks, IT admins can configure the browser as the only accessible application and define how users interact with the website.
Prerequisites
Before creating the kiosk configuration, ensure that:
- The iPad is supervised.
- The device is enrolled in Scalefusion MDM.
- The target website has been tested.
- The required browser is available on the device.
How to lock an iPad to one website
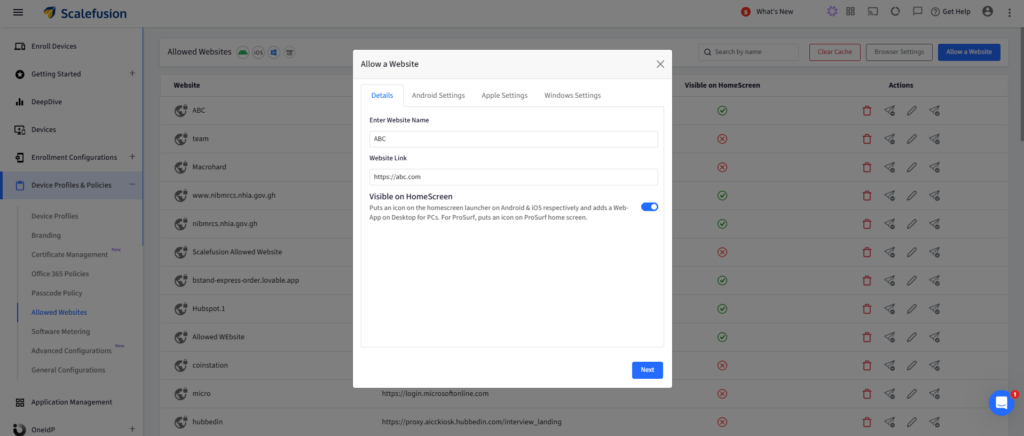
Step 1: First, you have to create an allowed website list. Go to Device Profiles & Policies > Allowed Websites. Click ‘Allow a Website’ to add the website name and URL to be allowed on the iPad. Configure additional settings in Apple Settings and click Save.
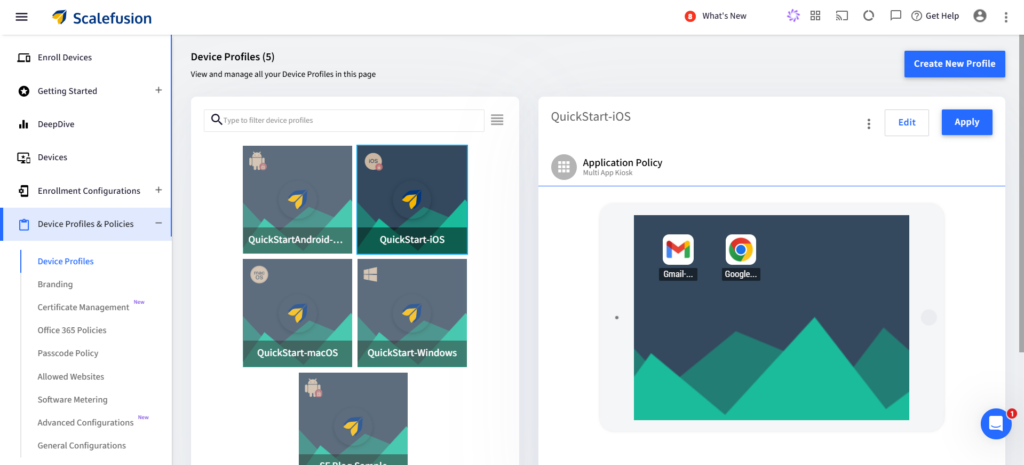
Step 2: Create or edit an iOS/iPadOS device profile by navigating to Device Profiles & Policies and clicking Create New Profile or Edit (on an existing profile).
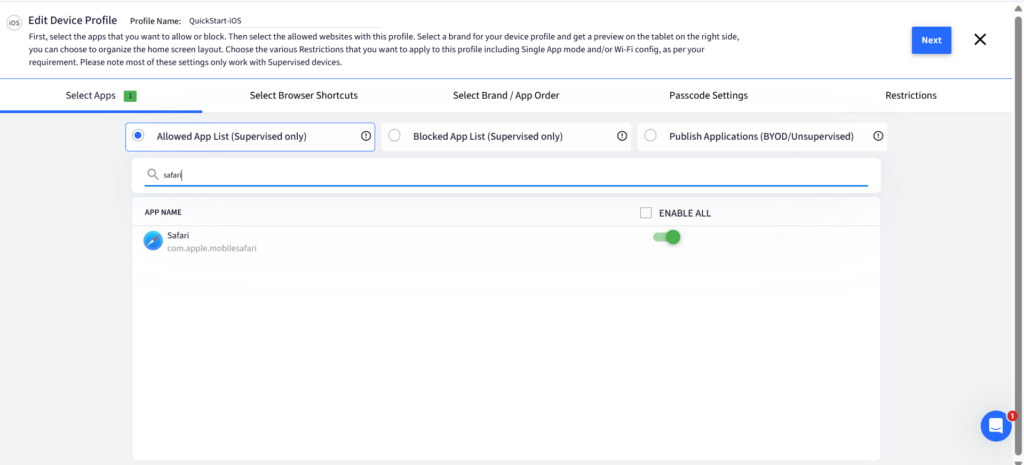
Step 3: Under Select Apps, choose the allowed browser application. E.g., you can choose Safari. If you don’t find the app you are looking for, add it from Application Management > Apple Apps.
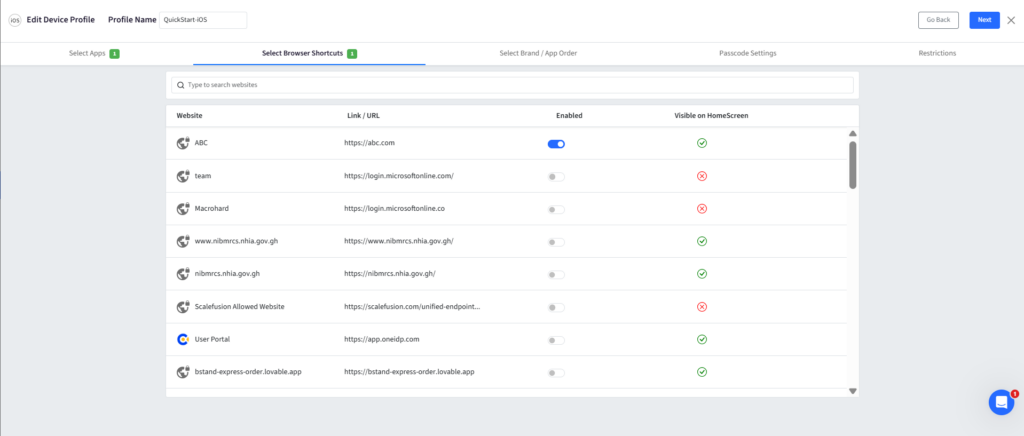
Step 4: Move to Select Browser Shortcuts and toggle on the ‘Enabled’ button next to the website you allowed in Step 1.
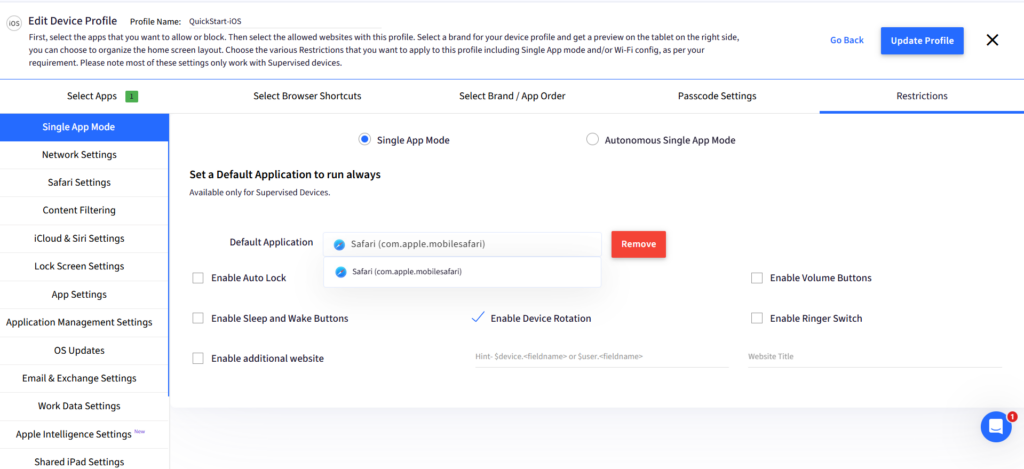
Step 5: In Restrictions > Single App Mode, select the browser application you enabled in Step 3 (in this case, Safari) to always run in single app mode.
Step 6: Then, navigate to Content Filtering and check the box for Configure Content Filtering. Now, select the Access to Allowed Sites only option.
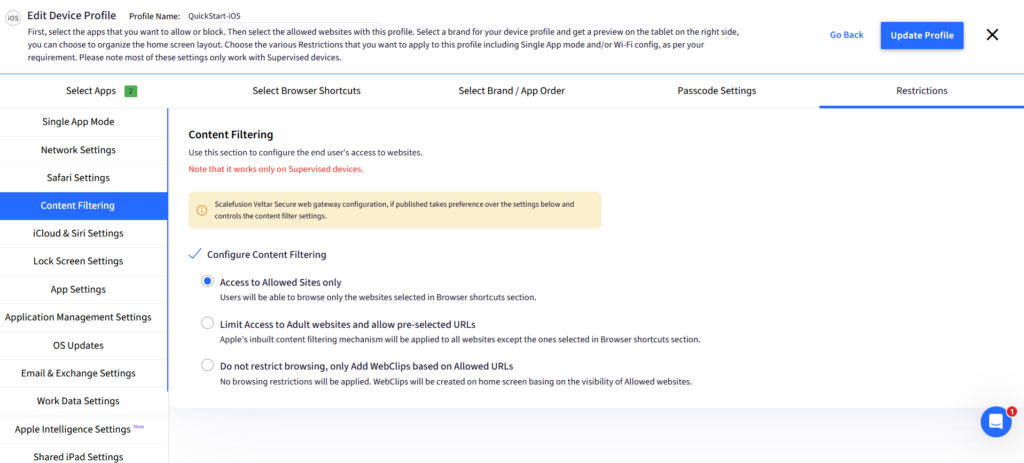
Step 7: Click Update Profile or Create Profile and publish it to your iPad. The device will be locked to only the selected website in kiosk mode.

Option B: Deploy a website kiosk using ProSurf iOS kiosk browser
Scalefusion’s ProSurf iOS kiosk browser allows IT admins to lock iOS devices into kiosk mode, with only one website allowed. It provides additional settings like custom URL configuration, restricting access to just the URL instead of the complete domain, and Always Load Root URL at Launch, along with application-level browser settings like hiding address and navigation bars. Such features make ProSurf a powerful tool for specific use cases such as locking iPads to one website with a kiosk experience.
Step 1: Navigate to Device Profiles & Policies > Allowed Websites > Browser Settings. Click on the ProSurf tab.
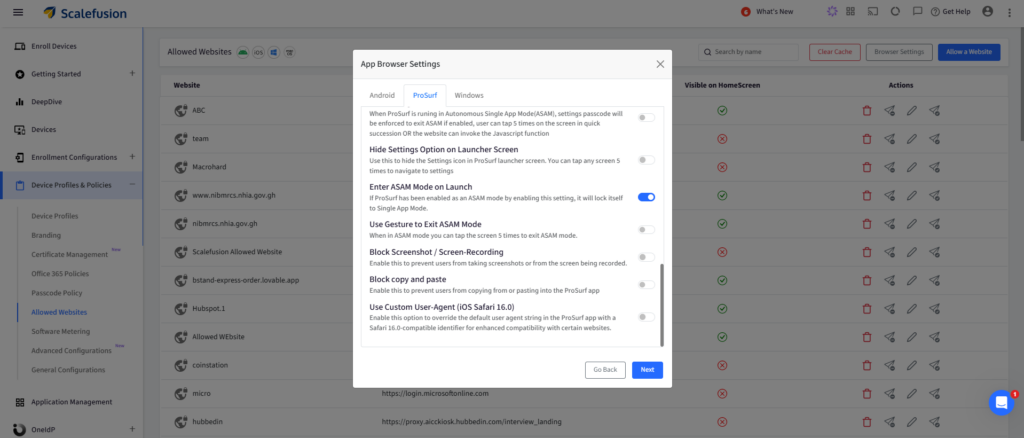
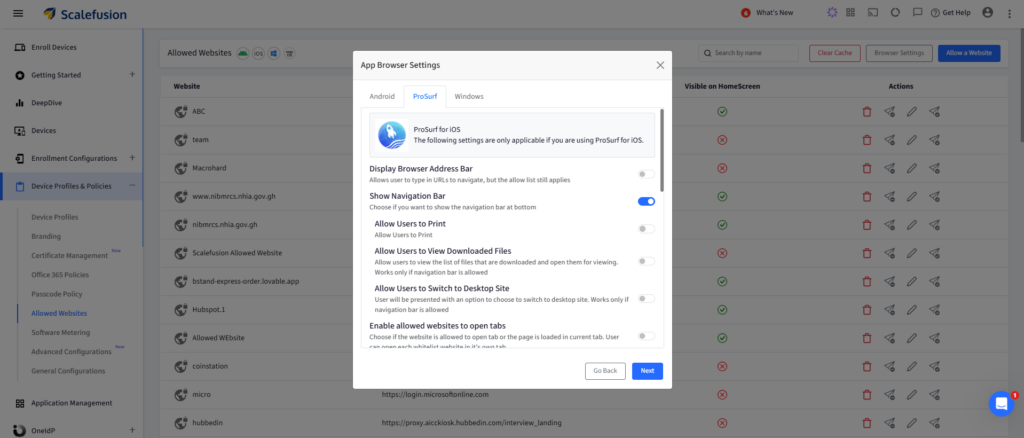
Step 2: Configure ProSurf browser settings from Browser Settings. Hide the address and navigation bars and the settings option on the launcher screen. Enforce always-on full-screen mode. Optionally, you can enable Always Browse in Incognito Mode. Once you are done configuring the settings, click Save.
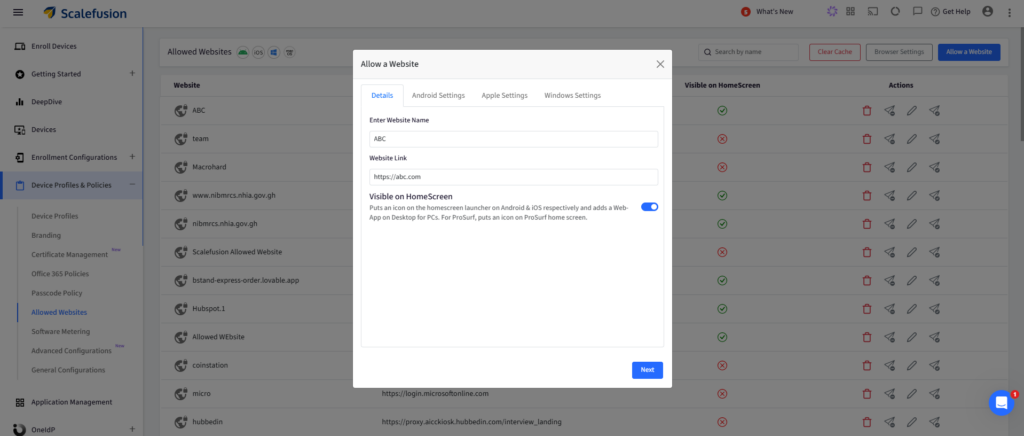
Step 3: Click ‘Allow a Website’ and add the website name and its URL that is to be allowed on the iPad. Go to Apple Settings to configure additional settings and click Save.
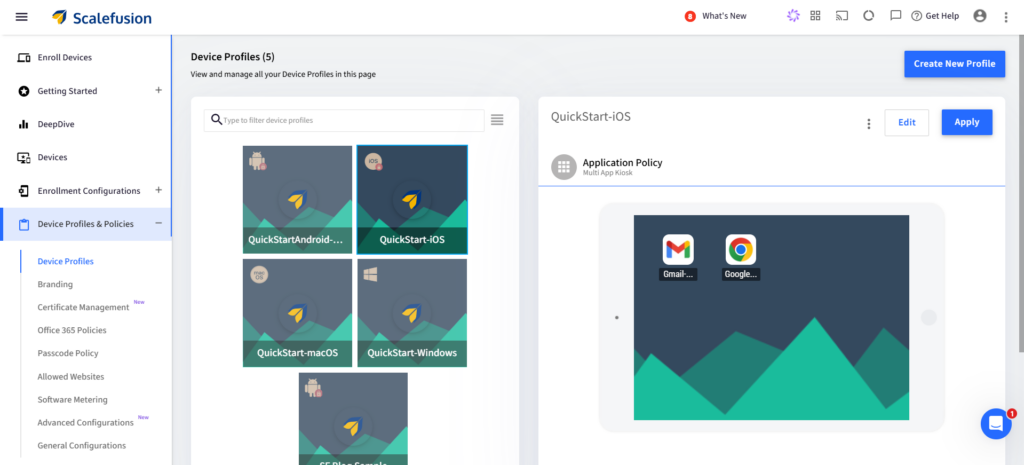
Step 4: Create or edit an iOS/iPadOS device profile by navigating to Device Profiles & Policies and clicking Create New Profile or Edit (on an existing profile).
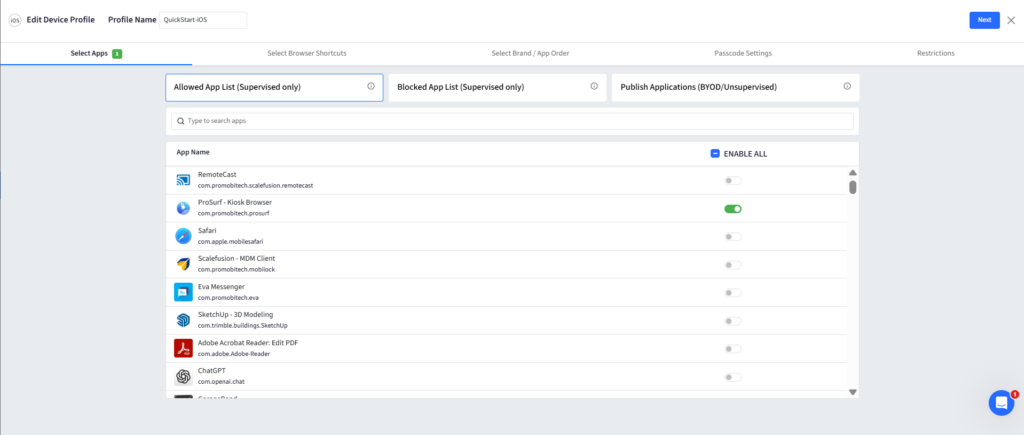
Step 5: Under Select Apps, enable ProSurf Kiosk Browser.
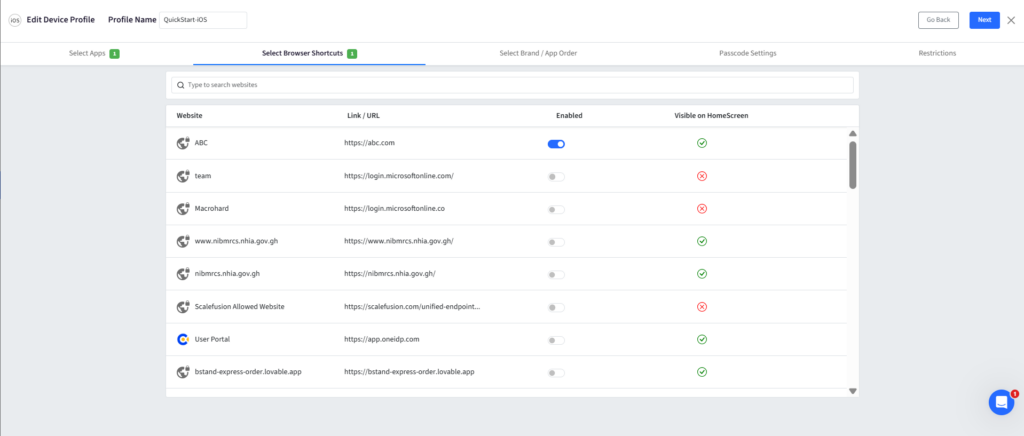
Step 6: Move to Select Browser Shortcuts and toggle on the ‘Enabled’ button against the website you allowed in Step 3.
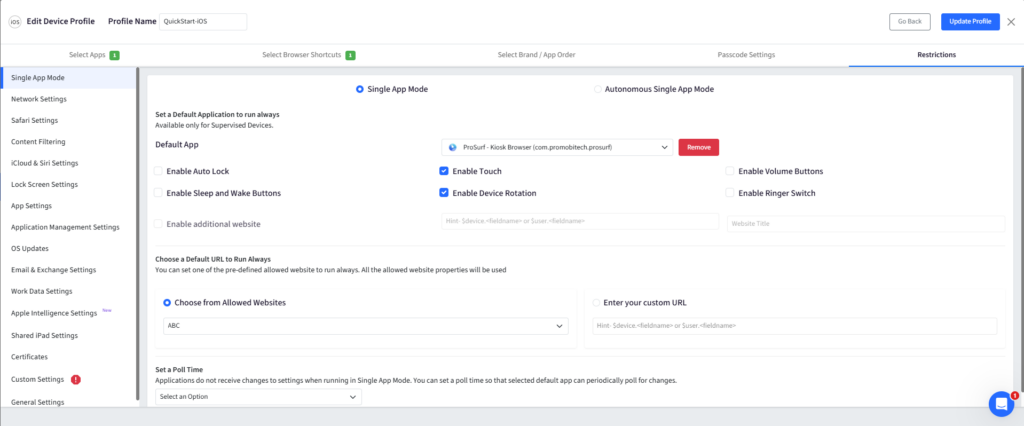
Step 7: In Restrictions > Single App Mode, select ProSurf Kiosk Browser to always run in single app mode. Next, choose the allowed website as the default URL to always run in the browser.
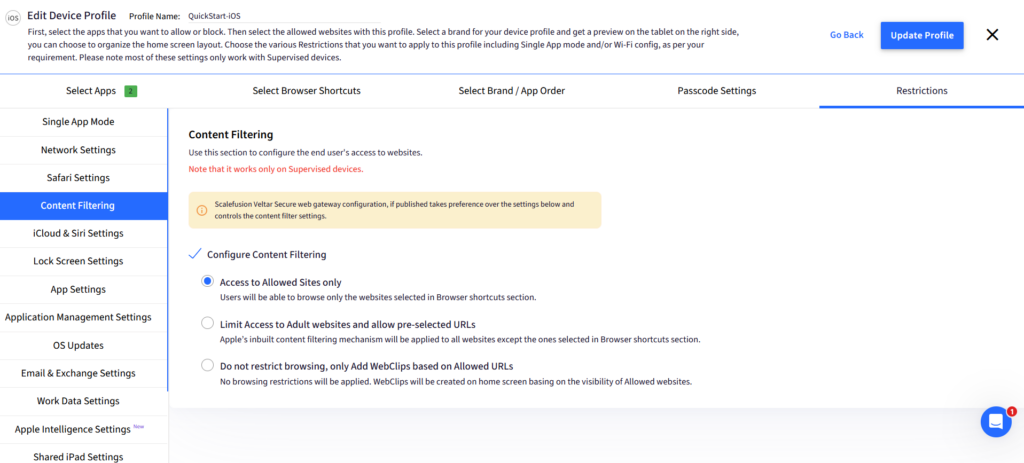
Step 8: Then, navigate to Content Filtering and check the box for Configure Content Filtering. Now, select the Access to Allowed Sites only option.
Once you create or update the profile and publish it to your iPad, the device will run in kiosk mode, with ProSurf showing only the one website you enabled.
Troubleshooting common kiosk setup issues
Even with the correct configuration, a few common issues can prevent an iPad kiosk from working as expected.
| Issue | Possible cause | Resolution |
|---|---|---|
| Website doesn’t load | The URL isn’t approved, or the device has no network connectivity. | Verify the URL, confirm network access, and ensure the website is reachable. |
| Exit option is visible | Exit settings haven’t been configured for the kiosk profile. | Review the kiosk profile and update the exit option according to your deployment requirements. |
| Safari displays its normal interface | Website restrictions have been applied without enabling kiosk behavior. | Verify that Single App Mode or the appropriate kiosk configuration has been enabled. |
| Single App Mode isn’t applied | The iPad isn’t supervised. | Confirm the device is supervised before applying the kiosk profile. |
| Profile isn’t reaching the device | The device isn’t assigned to the intended device group, profile deployment failed, or the device doesn’t have internet connectivity. | Verify the device’s group assignment, confirm it has an active internet connection, and republish the profile if necessary. |
| Web Clip opens in a standard browser window | The Web Clip wasn’t configured for the intended launch behavior. | Review the Web Clip configuration and redeploy the updated profile. |
Validating the configuration on a small test group before deploying it organization-wide helps identify these issues early and minimizes disruption.
iPad lockdown industry use cases
Restricting an iPad to a single website supports a wide range of business and educational workflows where users only need access to one web-based application.
Education
Schools can configure iPads to open a learning management system, online assessment portal, or digital classroom platform without allowing access to unrelated websites during lessons or examinations.
Retail
Retail stores often deploy website kiosks for product catalogs, customer self-service checkouts, loyalty program registration, or endless aisle experiences where shoppers browse products that may not be available in-store.
Healthcare
Hospitals and clinics can provide access to patient registration portals, appointment check-in systems, or digital consent forms while preventing unintended browsing.
Corporate offices
Organizations can use website kiosks for visitor registration, employee self-service portals, room booking systems, or internal dashboards displayed in shared spaces.
Hospitality
Hotels, restaurants, and event venues can deploy website kiosks for guest check-in, event registration, digital menus, or customer feedback forms.
Across these scenarios, the objective remains the same: provide access to the required web application while reducing unnecessary interaction with the rest of the device.
Lock an iPad to one website with Scalefusion
There isn’t a single method that fits every deployment. Built-in features like Screen Time and Guided Access work well for personal devices or temporary restrictions. Apple Configurator helps prepare supervised devices for advanced management. DNS filtering adds another layer by limiting website access across a network but doesn’t create a dedicated kiosk experience.
For organizations deploying shared iPads across classrooms or various industries, iPad MDM like Scalefusion simplifies website kiosk deployments. It enables IT admins to configure devices remotely, apply consistent policies, and manage updates from a central console instead of configuring each iPad individually.
With Scalefusion, organizations can deploy website kiosks, configure Single App Mode, publish Web Clips, and manage iPads throughout their lifecycle from a unified dashboard, making large-scale kiosk deployments easier to implement and maintain.

FAQs
1. How do I put my iPad into single-app mode?
For temporary use on a single iPad, enable Guided Access from Settings > Accessibility > Guided Access, open the app or browser you want to lock, and triple-click the top or Home button to start it. For enterprise Single App Mode across a fleet of iPads, use an MDM solution with supervised devices – this is enforced centrally by IT rather than turned on by the user.
2. What are the use cases of iPads running only one website?
iPads running only one website are commonly used in kiosk setups, allowing businesses to provide specific information or services to customers in a controlled environment. This setup is also utilized in educational settings for focused online learning experiences.
3. How do I allow only one website on my iPad?
To allow only one website on your iPad, you can use the built-in “Screen Time” feature. Go to Settings > Screen Time > Content & Privacy Restrictions > Content Restrictions > Web Content, and select “Allowed Websites Only.” Add the specific website you want to allow under the “Always Allowed” section. For locking multiple iPads to a single website and managing them securely, an MDM solution with iOS support is an ideal choice.
4. What’s the difference between Single App Mode and Guided Access?
Single App Mode is enforced by IT through MDM and completely locks the device to one app. Users can’t exit it, and it’s mainly used for kiosks, POS systems, and other enterprise setups. Guided Access, on the other hand, is turned on by the user, doesn’t require MDM, and is meant for short, temporary sessions. Users can exit it anytime with a passcode.
5. How do I set up Guided Access on an iPad?
To set up Guided Access mode on an iPad, go to Settings > Accessibility > Guided Access and turn it on. Then set a passcode. Once enabled, open the app you want to lock the device to and triple-press the Home or Side button to start Guided Access. When you’re done, triple-press again and enter the passcode to exit.

