
You can block websites on a Mac by using Screen Time, browser settings, router-level restrictions, DNS filtering, or an MDM solution for managed macOS devices. For businesses and schools, MDM-based website blocking is the most reliable approach because it lets IT teams remotely restrict harmful, distracting, or non-compliant websites across multiple Macs while keeping policies consistent and difficult for users to bypass.
Key Takeaways
Blocking websites on Mac improves productivity, strengthens security, and helps organizations enforce safer browsing policies across managed macOS devices.
- Choose the Right Approach: macOS offers built-in options like Screen Time and Terminal for basic website blocking, while MDM solutions provide centralized management for business environments.
- Protect Users and Data: Restricting access to malicious, phishing, entertainment, or non-work-related websites reduces security risks, supports compliance, and minimizes workplace distractions.
- Scale Beyond Manual Configuration: Configuring website restrictions individually works for personal devices, but centralized policy deployment is more efficient for schools, enterprises, and distributed teams.
- Reduce Common Workarounds: Enterprise-grade website filtering can enforce more consistent browsing policies across managed Macs, with greater visibility and control than native macOS settings offer alone.
- Build a Complete Browsing Policy: Combining URL blocklists, allowlists, category-based filtering, and reporting helps organizations balance user productivity, web security, and operational flexibility.

Create an allowed or blocked website list, apply a macOS content filtering profile, choose whether users can access only approved sites or block selected categories and domains, publish the profile to a device group, then test the policy across Safari, Chrome, incognito mode, and off-network use.
Keeping users on track while using Macs isn’t always easy. Between social media, gaming sites, and all kinds of distractions, unmanaged web access can quickly become a productivity killer — or even a security risk.
Whether you’re running a school, a business, or a remote team, blocking certain websites on macOS devices is about keeping users focused, safe, and compliant.
Sure, macOS offers some basic tools to limit browsing. But when you need something sharper, more reliable, and easy to manage across multiple devices, you need a better plan.
Let’s break down the right way to block websites on Mac — from the built-in options to a smarter, scalable method with Scalefusion UEM.
How to block websites on personal devices
macOS offers some basic ways to control website access. Here’s how you can do it:
Using Screen Time on Mac:
- Go to System Settings → Screen Time.
- Select the user account you want to apply the restrictions to.
- Click on Content & Privacy Restrictions.
- Turn on Content & Privacy Restrictions if not already.
- Under Web Content, choose either:
- Limit Adult Websites (macOS auto-filters adult content but allows manual blocklists).
- Allowed Websites Only (only sites you manually approve will open).
You can then manually add specific websites you want to block or allow.
This matches Apple’s own device management documentation, which confirms that managed Apple devices support a web content filter payload – letting admins deny specific websites, allow only approved sites, automatically filter adult content, and add bookmarks for allowed sites. Apple also notes that organizations with complex or legally mandated filtering requirements should look at a global HTTP proxy or an advanced third-party content filtering solution, which is where MDM and Veltar-based filtering (below) come in.
Why blocking websites natively on Mac isn’t always enough
While Screen Time gives you a start, it’s not sufficient for fleet-wide enforcement, especially if you’re managing multiple devices or need stricter control. Here’s why:
- May be easier to bypass: Users with admin access or unmanaged devices can sometimes find ways to disable Screen Time or change its settings.
- Manual work: You have to configure settings individually for each Mac. No central management means scaling this across teams or classrooms is time-consuming.
- Limited options: macOS mainly filters “adult content” but doesn’t let you finely control categories like gaming, social media, shopping, etc.
- No real-time monitoring: You can’t track browsing activity or receive alerts if users attempt to access blocked sites.
Simply put, it works for personal use, not for serious device management at scale.
How to block websites on Mac using Scalefusion
When you need a reliable, scalable, and centrally managed solution, Scalefusion macOS device management steps in. It lets IT admins oversee browsing activities on managed Mac devices professionally, using Web Content Filtering settings.
Here’s a clear breakdown of how to set it up:
Step 1: Create a master list of allowed websites
Before applying restrictions, you’ll first need to define what websites users can access.
- Log in to your Scalefusion Dashboard.

- Navigate to Device Profiles & Policies → Allowed Websites.

- Click Allow A WEBSITE.
- Fill in:
- Website Name (How it’ll appear as a web clip if you choose to show it).
- Website Link (Complete URL; wildcards are not supported).
- Visible on Home Screen toggle (decide if you want a clickable shortcut on the Dock).
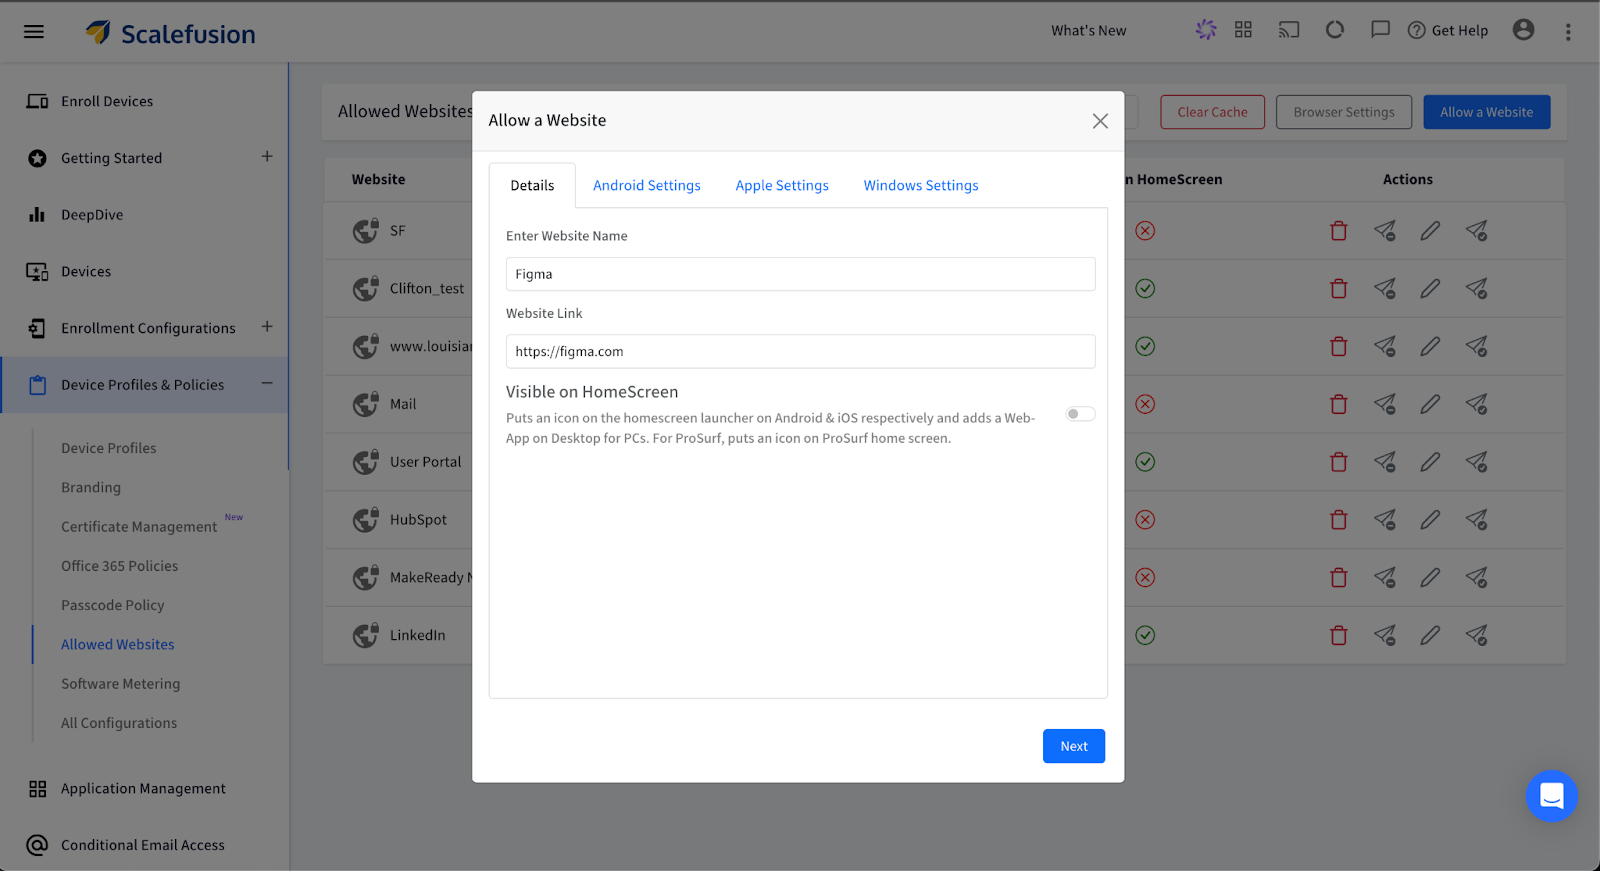
- Under Apple Settings, optionally upload a logo for your web clip.

- Click SAVE.
The site now appears in your master list.
Step 2: Enable content filtering on Mac devices
Now that you have your website list, apply it to devices:
- Go to Device Management → Device Profiles.

- Either Create New Profile or Edit an existing Mac Device Profile.
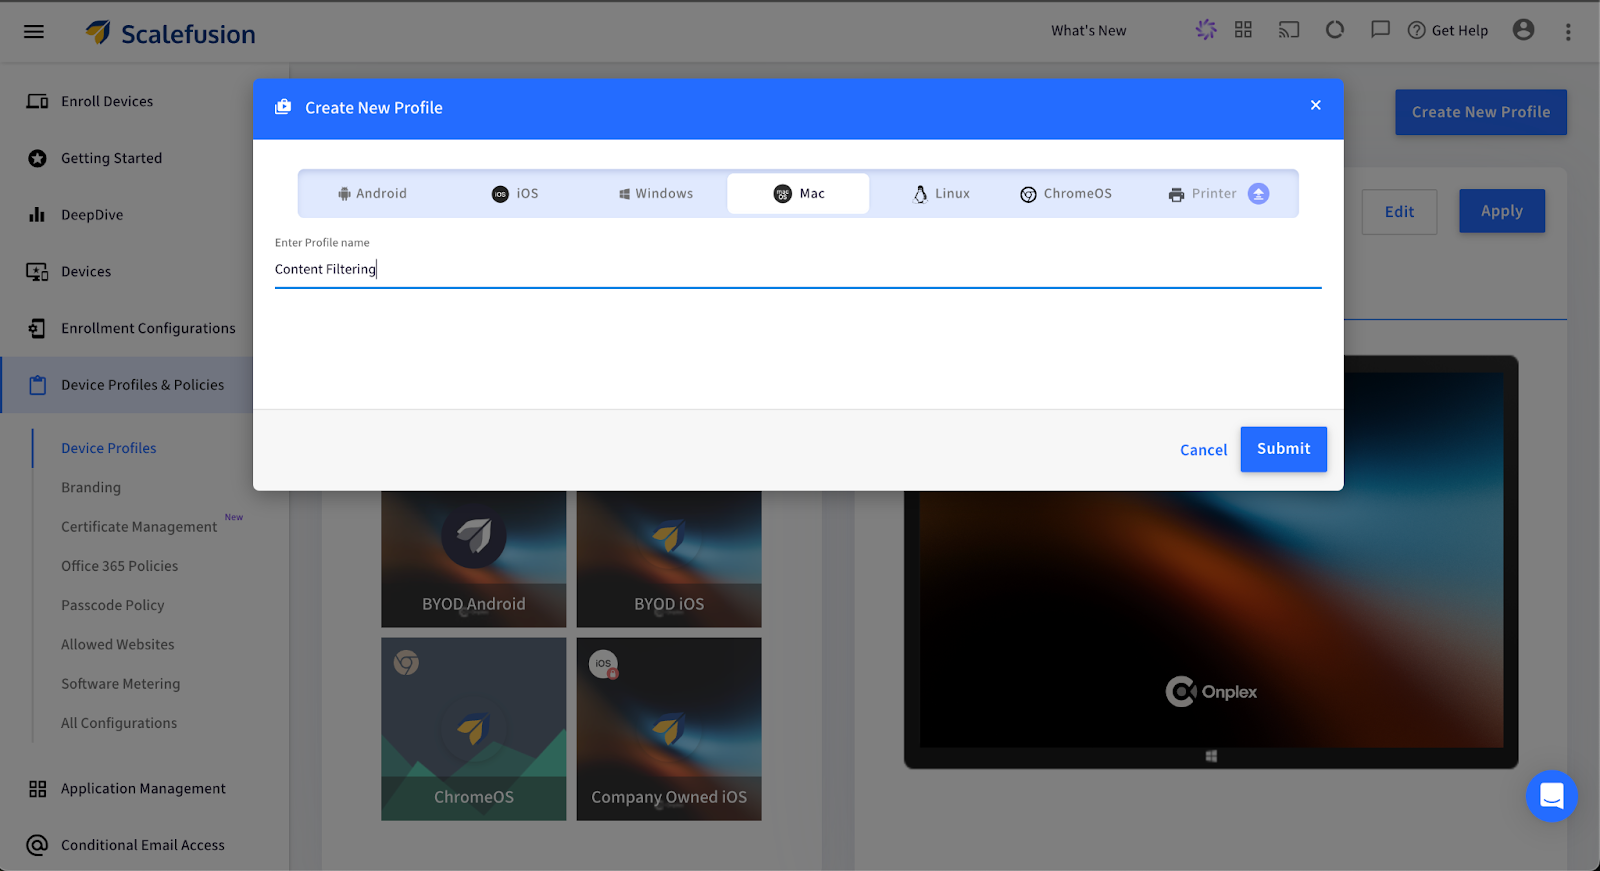
- Click on the Content Filtering option.
- Under Content Filtering:
- Disable Siri & Dictation (optional if you want extra restrictions).
- Hide Profanity in Dictionary & Dictation (optional).
- Configure Allowed Websites: Enable this to start website control.

- You will now have two options:
- Allow Access to Allowed Sites Only: Users can access only the websites from your master list.
- Limit Access to Adult Websites: Let Safari’s built-in filter work while manually allowing some extra sites.

- Add Web-Clips to Dock: Optional if you want visual shortcuts to approved websites.

- Select from your Allowed Websites list the websites you want active for this profile.
- Click SAVE.
That’s it. All Macs assigned to this Device Profile will now follow the browsing restrictions you’ve set.
How to block websites on macOS using Veltar
For more precise control over web access on macOS devices, Scalefusion Veltar offers advanced filtering options. IT admins can block entire categories, specific domains, or even domain patterns, making it ideal for schools, businesses, and teams that need granular, policy-driven web access management at scale.
Follow these steps to set it up:
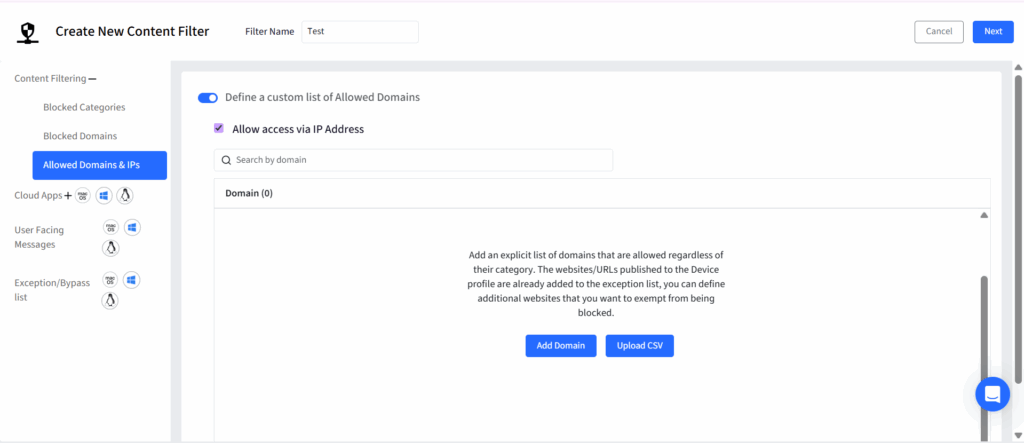
Step 1: Create a filter
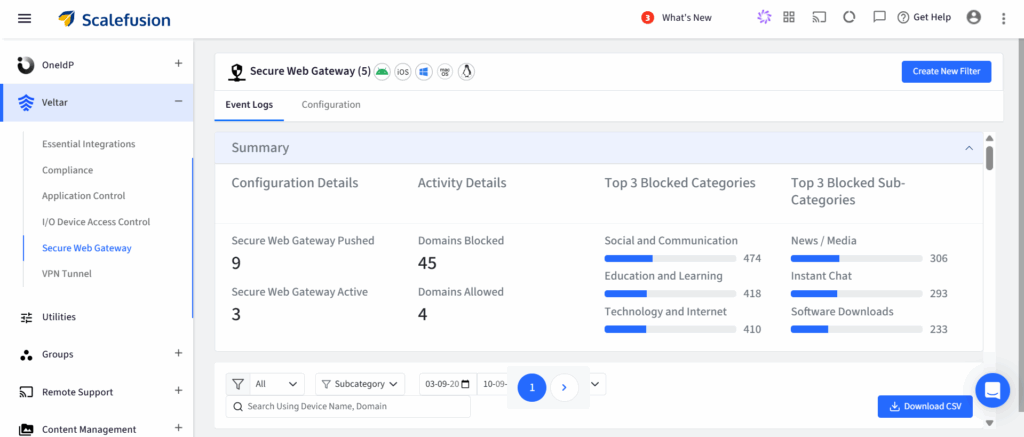
- Go to Scalefusion Dashboard → Veltar → Secure Web Gateway.
- Click Create New Filter and give it a name.
Step 2: Configure the filter settings
- Categories to block: Select entire categories like social media, adult content, etc.
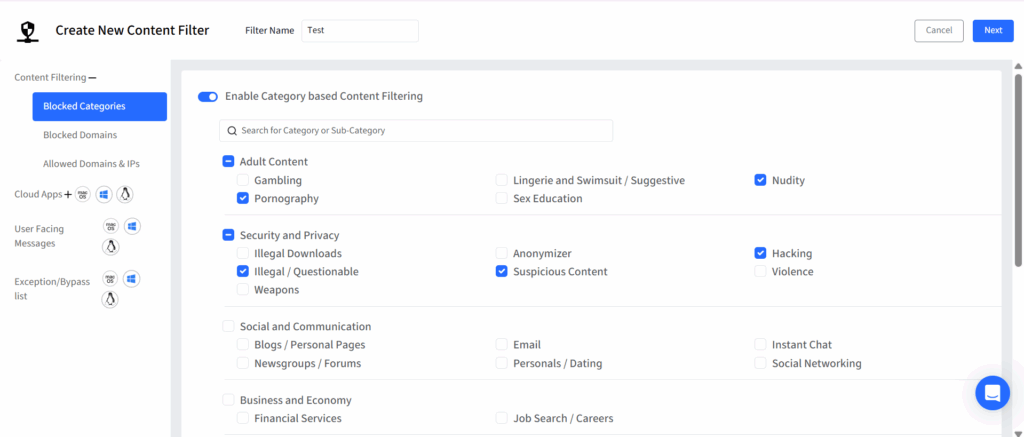
- Blocked domains: Add specific domains manually or upload via CSV.
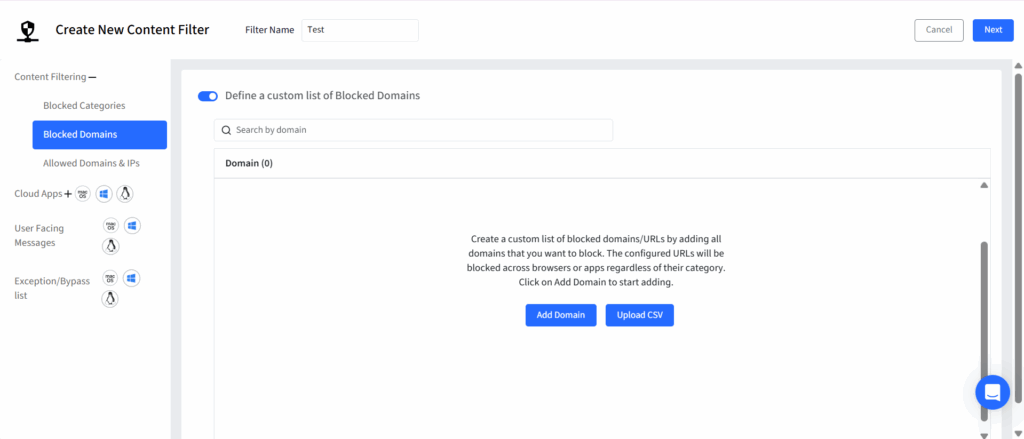
- Allowed domains: Add exceptions to permit specific URLs even if they fall under blocked categories.
Step 3: Use domain patterns
- www.domain.com – Blocks only that domain.
- *.domain.com – Blocks all subdomains.
- domain.* – Blocks all top-level variants.
- *.domain.* – Blocks subdomains and top-level domains.
- domain.com – Blocks the domain and all its subdomains.
Step 4: Save and apply
- Click Save (top right).
- The filter will appear on the Secure Web Gateway page and can be applied to your macOS device profiles.
- Multiple filters can be created to suit different teams, departments, or use cases.
Simplify website blocking on Mac with Scalefusion
You can wrestle with built-in Mac settings and jump through menus for every device. Or you can take five minutes, set up Scalefusion, and manage browsing policy centrally across every Mac you oversee.
With Scalefusion UEM, you get centralized device management. With Veltar, you get advanced web filtering that goes beyond basic restrictions, blocking categories, domains, or even domain patterns with precision.
When you’re serious about focus, security, and scaling, guesswork isn’t good enough.
Set the policy.
Apply it fleet-wide.
Manage it centrally.
Move on to bigger things — because micromanaging web access shouldn’t be your full-time job.
If you’re looking for a clean, professional way to manage web access, Scalefusion macOS management solution is the way to go.


FAQs
1. Can I permanently block a website on a Mac?
Yes, with the right approach. macOS Screen Time offers basic, single-device controls. For persistent, policy-based blocking across a fleet, Scalefusion Veltar enforces website blocks at the device and browser level. How completely it holds up if a user switches browsers, networks, or tries incognito mode depends on the filter type, profile lock, and device supervision settings in place.
2. How do I permanently block a website on Apple devices?
For Apple devices like macOS and iPads, Veltar lets IT admins define web filtering policies centrally. Once applied, blocked websites are enforced across Safari, Chrome, and other supported browsers without per-device manual setup. On a properly supervised and enrolled device, policies continue to apply off the home or school network as well.
3. How to make a MacBook kid-friendly?
Making a MacBook safe for kids goes beyond blocking a few sites. With Veltar, schools and institutions can allow only age-appropriate categories, restrict harmful or distracting content, and apply different rules for school hours vs. free time. It’s especially useful for schools and organizations managing multiple Apple devices.
4. Can I set up a schedule to block websites only at certain times of the day?
Yes. Veltar supports time-based web filtering, so websites can be blocked during study or school hours and allowed later. This helps balance safety, focus, and flexibility, something macOS built-in controls handle only in a limited way.
5. Can I block websites on macOS without an app?
Yes, you can block websites without an app using built-in options like modifying the hosts file, Screen Time on macOS/iOS, or router-level controls. These methods are manual, easy to bypass, browser-dependent, and don’t offer monitoring, scheduling, or reporting.
For reliable, scalable blocking (especially across devices and networks), a dedicated solution like Scalefusion Veltar is far more effective, with centralized policies, real-time enforcement, and visibility built in.
