

You can set up Windows 11 kiosk mode by using Assigned Access or an MDM solution to lock the device to a single app, multiple approved apps, or a controlled browser experience. For businesses, MDM-based kiosk setup is the most reliable approach because it lets IT teams remotely configure restrictions, manage apps, block unauthorized access, and keep Windows 11 devices secure for self-service, retail, education, healthcare, and frontline use cases.
Key Takeaways
Windows 11 kiosk mode transforms standard PCs into secure, purpose-built devices by restricting access to approved applications, settings, and system functions.
- Choose the Right Kiosk Type: Single-app mode is suited to digital signage, point-of-sale, and self-service terminals, while multi-app mode supports shared workstations, classrooms, and frontline workflows.
- Select an Appropriate Setup Method: Windows Assigned Access works for basic single-device deployments, PowerShell supports advanced Win32 app configurations, and UEM is better suited to managing kiosk fleets at scale.
- Restrict Unauthorized Device Access: Kiosk policies prevent users from accessing the desktop, system settings, files, unapproved applications, and other functions unrelated to the device’s intended purpose.
- Configure Apps and User Accounts Carefully: Administrators should define approved applications, select an existing user or automatically create a kiosk account, and test the experience before deployment.
- Manage Kiosks Centrally at Scale: A UEM solution enables IT teams to remotely apply profiles, update policies, monitor device health, troubleshoot issues, and maintain consistent security across Windows 11 devices.
Whether it is a retail store running a customer-facing self-service terminal, a hospital using a check-in screen at reception, or a school lab offering limited-access computers to students, one thing is clear: shared Windows devices must be locked down. You don’t want users fiddling with system settings, browsing the web freely, or accessing unauthorized apps. These devices must serve a single purpose and they should do it securely.
That is where Windows 11 Kiosk Mode comes in. Designed to restrict user access and streamline device functionality, kiosk mode transforms a regular desktop into a purpose-specific machine.
In this guide, we will show you how to set up kiosk mode in Windows 11 using three different methods:
- Assigned Access (built-in Windows feature)
- PowerShell (for UWP/Edge/Win32 apps)
- UEM (for enabling kiosk mode at scale)
What is kiosk mode in Windows 11?
Kiosk Mode in Windows 11 is a configuration that locks down a device to run only specific apps. It creates a restricted environment that prevents users from accessing system files, settings, or any unauthorized software.
Once a device boots up in kiosk mode, it automatically launches a pre-configured app (or apps), eliminating distractions and protecting sensitive settings. It is especially useful for:
- Customer service counters in retail.
- Check-in and info kiosks in healthcare.
- Exam or learning stations in education.
- Public web browser terminals in libraries or cafes.
- Digital signage systems.
What are the types of kiosk mode in Windows 11?
1. Single-App Kiosk Mode
In the single-app kiosk mode, the device runs only one app in full-screen. The user cannot switch or exit the app. This mode is ideal for use cases such as:
- Digital signage
- Point-of-sale (POS) systems
- Purpose-specific device
- Examination computers
2. Multi-App Kiosk Mode
The multi-app kiosk mode allows a controlled list of apps that users can access. While users can use multiple allowed apps, they can’t exit the kiosk mode or explore other system areas. This mode is suitable for:
- Shared workstations in schools
- Multi-function kiosks in airports
Single-app vs. multi-app kiosk mode comparison
| Aspect | Single-app kiosk mode | Multi-app kiosk mode |
|---|---|---|
| Core concept | Restricts the device to running exactly one app in full-screen. | Restricts the device to a customized Start Menu with multiple approved apps. |
| User interface | The app launches instantly at boot; there is no desktop, taskbar, or Start Menu. | A highly restricted desktop view with a custom Start Menu and optional taskbar. |
| Ideal use cases | ATMs, digital check-in desks, ticketing machines & informational digital signage. | Retail POS systems, logistics handhelds & student workstations. |
| App switching | Not possible (the user cannot exit or minimize the app). | Allowed (the user can switch between any of the pre-approved allowlist apps). |
Get Your Windows 11 Kiosk Up and Running.
Turn any Windows 11 device into a purpose-built kiosk in minutes
Ways to Set up Windows 11 Kiosk Mode
Depending on your use case, technical expertise, and number of devices, there are multiple ways to enable kiosk mode in Windows 11. Below, we explore three proven methods ranging from Windows’ built-in tools to a scalable enterprise solution using UEM.
Method 1: Setup Windows 11 Kiosk Mode Using Assigned Access (Kiosk or restricted user experience)
Assigned Access is a built-in Windows feature that lets you configure a kiosk by assigning a single app to a user account. This is the most straightforward method for setting up kiosk mode on a Windows 11 device.
Steps to set up a basic single-app kiosk mode on Windows 11 using Assigned Access:
- Log in to your Windows 11 device using an Administrator account.
- Press Windows Key + I to open Settings. Go to Accounts > Other Users.
- Scroll down to the Set up a kiosk section and click Get started.
- Enter a name for the new kiosk account or choose an existing account.
- Select the app you want to run when the kiosk account signs in.
- If you select Microsoft Edge, configure the app behavior options available.
- Click Next and then Close to complete the setup. Now, restart the device.
- Sign out of your admin profile and select the newly created kiosk account.
This is the most straightforward method for setting up kiosk mode on a Windows 11 device. When the kiosk user logs in, the device boots automatically into the assigned single app in full screen, completely hiding the desktop environment. Users cannot access other system features, file directories, or settings within that session.
Method 2: Setup Kiosk Mode with PowerShell (Native cmdlet/MDM Bridge WMI Provider)
There are two ways to enable kiosk mode on Windows 11 devices using PowerShell. The native Set-AssignedAccess cmdlet locks a specific local user account to a single UWP app or Microsoft Edge. Alternatively, the MDM Bridge WMI Provider is used for advanced multi-app or Win32 desktop app configurations.
The native cmdlet is the most efficient, scriptable method for standard single-app setups.
Steps to set up single-app kiosk mode on Windows 11 using the native Set-AssignedAccess cmdlet:
To enable kiosk mode using PowerShell for UWP and Store apps:
1. Open PowerShell as Administrator on your Windows 11 device.
2. Create a kiosk user account (e.g., KioskUser) by running the following command:
$Password = Read-Host -AsSecureString "Enter password"
New-LocalUser -Name "KioskUser" -Password $Password -PasswordNeverExpires
3. Locate the App User Model ID (AUMID) string for your desired kiosk app by running the following command to list all installed modern apps:
Get-StartApps | Select-Object Name, AppID4. Assign the user to the app using the correct syntax. Replace KioskUser with the intended user account name and Your_App_AUMID_Here with the AUMID string you copied in Step 3:
Set-AssignedAccess -UserName "KioskUser" -AppUserModelId "Your_App_AUMID_Here"5. Restart the device and sign into the kiosk account to verify that the device boots into the assigned app.
This method is ideal for tech-savvy IT admins who want to bypass manual clicking, package configurations into local deployment scripts, or set up small batches of test machines simultaneously. It provides a powerful, code-driven alternative to the standard Windows Settings menu.
Method 3: Set Up Kiosk Mode in Windows 11 Using Scalefusion UEM
If you want to enable kiosk mode on Windows 11 devices at scale, Scalefusion Unified Endpoint Management (UEM) is the most efficient way. It allows centralized control, advanced policy settings, and remote deployment.
Steps to set up kiosk mode on Windows 11 using Scalefusion:
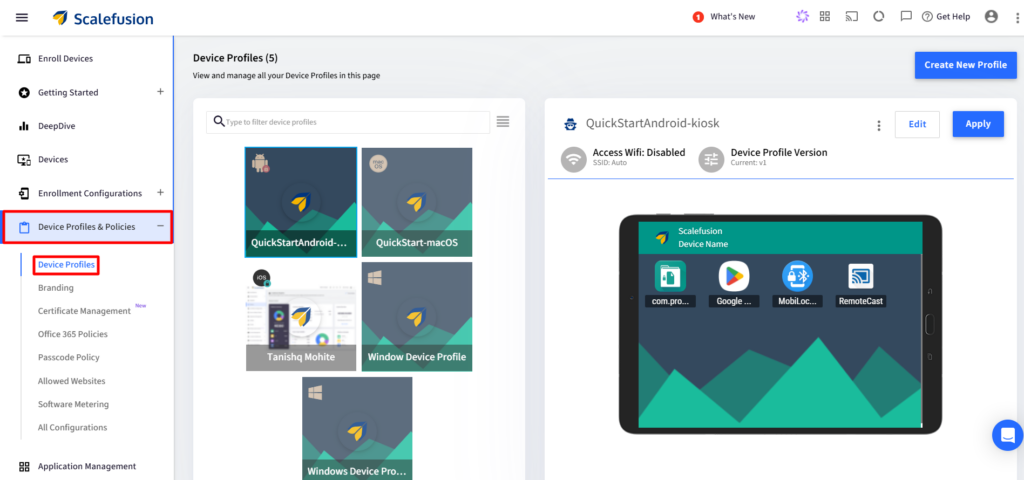
- Navigate to Device Policies & Profiles > Device Profiles from the Scalefusion dashboard.
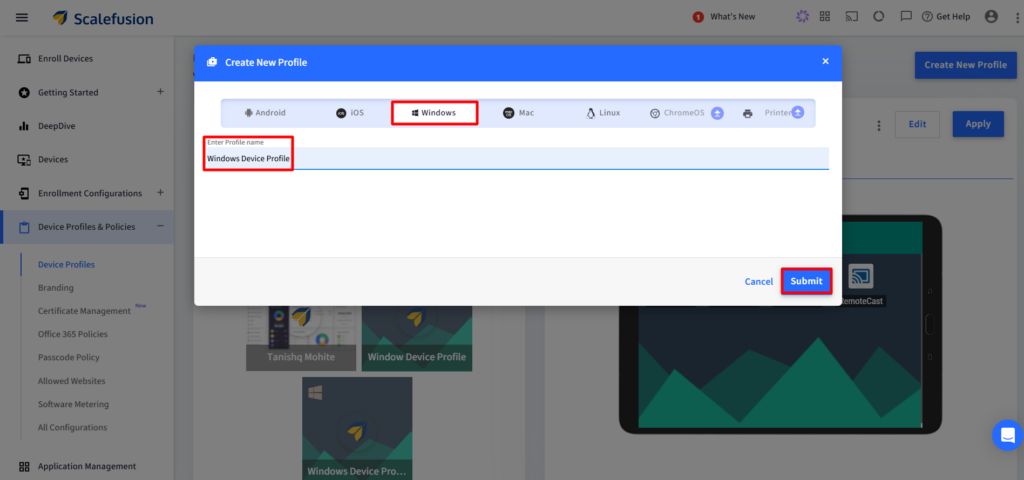
- Click Create New Profile and select the Windows tab. Enter a profile name and hit Submit.
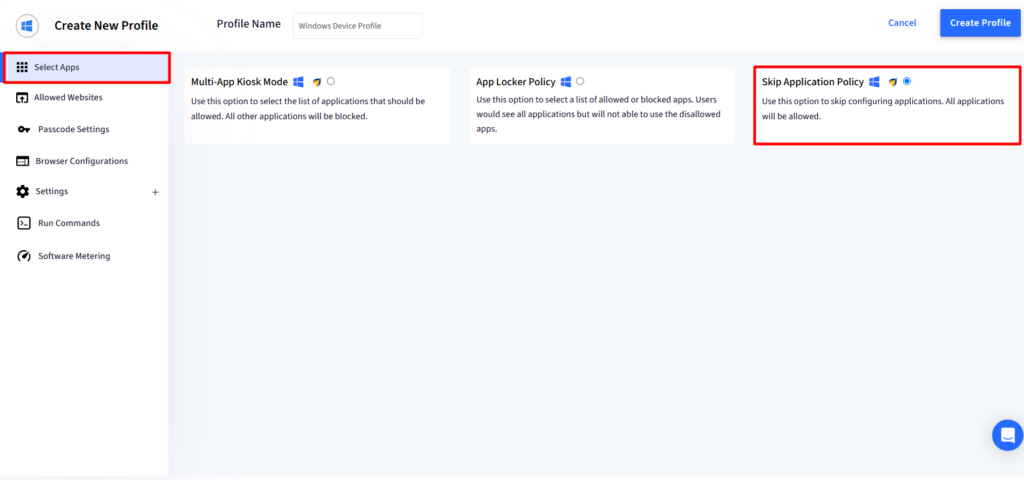
- Under Select Apps, choose Skip Application Policy for single app kiosk mode, otherwise select multi-app kiosk mode.
- Go to Settings > Single/Kiosk App Mode. From the drop-down, select the type of app to allow in kiosk mode.
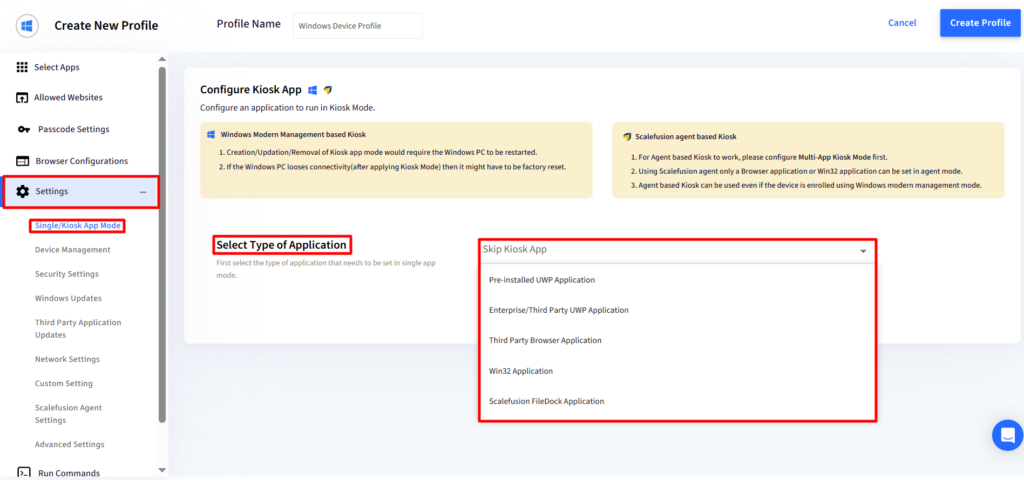
- Choose a user account to enable the kiosk mode for. There are two user account setup options available:
- Enter Primary Username: Select an existing user account on your Windows 11 device.
- Autocreate Kiosk User Account: Automatically create and log in a new kiosk user after reboot.
- Click Create Profile on the top-right corner. Use the Apply button on the device profile you just created to push it to individual devices or groups.
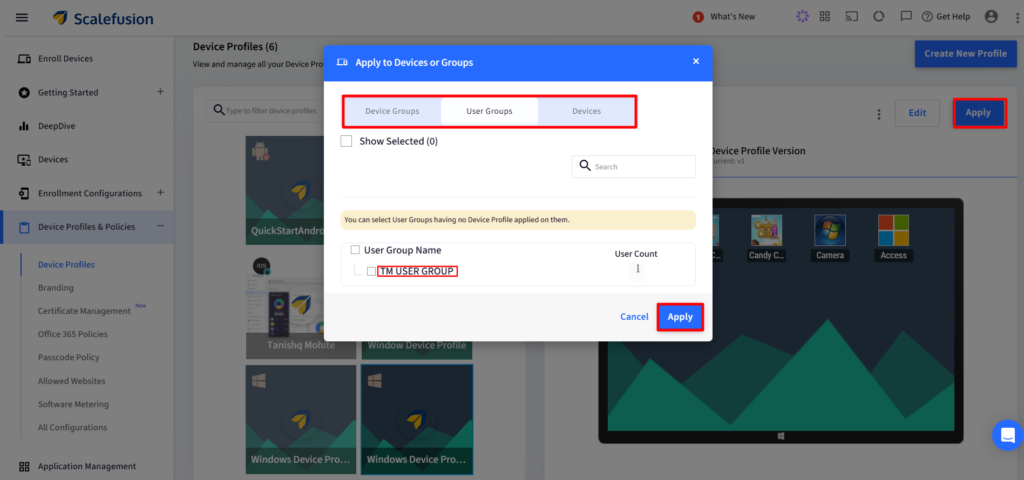
Your Windows 11 device now boots directly into kiosk mode as per your configuration.
Which is the best method to set up kiosk mode in Windows 11?
While Assigned Access is convenient for individual devices and PowerShell provides deeper control, they aren’t practical for managing kiosk mode at scale.
Scalefusion UEM is the best method if you prefer:
- Remote deployment
- Centralized configuration
- Single and multi-app kiosk modes
- Advanced controls and reporting
Comparing methods to enable kiosk mode on Windows 11
| Aspect | Assigned Access | PowerShell | UEM |
|---|---|---|---|
| Best for | Single local devices. | Tech-savvy admins automating local setups. | Enterprise-wide global fleet management. |
| Scalability | Low (manual per device). | Medium (batch local setups via scripts). | High (thousands of devices instantly over-the-air). |
| Skill required | None (simple GUI). | Medium (scripting & registry knowledge). | Low to medium (intuitive admin dashboard). |
| Multi-app support | No (Windows 11 GUI supports single-app). | No (native Set-AssignedAccess is single-app only). | Yes (via drag-and-drop cloud policy builders). |
| Remote management | No (requires physical access to device). | No (runs locally on the machine). | Yes (100% cloud-based remote control & updates). |
| App type support | UWP & Microsoft Edge only. | UWP & Microsoft Store apps only. Locking to Win32 apps requires XML & Shell Launcher or MDM WMI Bridge | UWP, Win32 (.exe) & progressive web apps (PWAs). |
| Peripheral controls | Basic (hides taskbar and start menu). | Advanced (manual registry tweaks). | Advanced (toggle-switch blocking for USBs, cameras, keys). |
| Monitoring & alerts | None. | None. | Real-time health, compliance tracking & instant alerts. |
Why Choose Scalefusion for Windows 11 Kiosk Mode Set up?
Scalefusion offers much more than just enabling kiosk mode on Windows 11. It’s a full UEM platform that simplifies managing your entire Windows device fleet. Here’s what makes it stand out:
- Multiple Device Profiles: Create custom kiosk configurations for different departments or use cases.
- Multi-App Kiosk Mode: Allow a restricted set of apps while blocking all others.
- Auto-Launch Apps on Boot: Ensure essential apps are always up and running.
- Security Policy Enforcement: Push firewall, antivirus, VPN, and Wi-Fi settings remotely.
- Real-Time Monitoring: Track device status, app usage, and compliance.
- Remote Troubleshooting: Fix issues from the Scalefusion dashboard without needing physical access.
- Custom Branding: Apply your logo, company theme, and lock screen design.
- Instant Kiosk Mode Removal: Switch off kiosk mode or reconfigure profiles as needed.
Whether you manage 10 devices or 10,000, Scalefusion helps you standardize configuration, reduce manual effort, and enhance security.age 10 Windows devices or 10,000, Scalefusion helps you standardize kiosk configuration, reduce manual effort, and enhance security.
Seamlessly Manage Your Windows Kiosks with Scalefusion
Windows kiosk mode is no longer a niche requirement. From customer service terminals to digital signage and secure examination environments, locking down Windows 11 devices is now a necessity. While Windows provides tools like Assigned Access and PowerShell, these methods don’t scale well or offer comprehensive control.
That’s why IT teams and organizations prefer Scalefusion UEM. It not only simplifies the setup of kiosk mode on Windows 11, but also offers full lifecycle management, remote policy control, and visibility into every device.

FAQs
1. Is Windows 11 kiosk mode suitable for public-facing devices?
Yes, Windows 11 kiosk mode is ideal for public-facing devices such as self-service kiosks, digital signage, and reception systems. It restricts user access to only approved apps or content, preventing misuse. For public environments requiring enhanced security and monitoring, centralized management tools like Scalefusion provide added control.
2. Can Windows 11 kiosk mode be managed remotely?
Native Windows 11 kiosk mode is configured locally and offers limited remote management. For organizations managing multiple devices, a UEM solution like Scalefusion enables remote kiosk configuration, monitoring, updates, and troubleshooting—eliminating the need for physical access to each Windows 11 kiosk device.
3. What apps can I use in Windows 11 kiosk mode setup?
Windows 11 kiosk mode supports Microsoft Edge, UWP apps, and select Win32 desktop applications. App availability depends on whether you use single-app or multi-app kiosk mode. For broader app support and easier deployment across devices, enterprise management platforms can simplify application control.
4. Can Windows 11 kiosk mode run a single website only?
Yes, Windows 11 kiosk mode can be configured to run a single website using Microsoft Edge in digital signage or kiosk mode. The browser launches full-screen and restricts navigation. For advanced URL control, session recovery, and uptime monitoring, managed kiosk solutions offer extended capabilities.
5. Is Windows 11 kiosk mode suitable for multi-location deployments?
While Windows 11 kiosk mode works well for individual devices, managing kiosks across multiple locations can be challenging when configured manually. Organizations with distributed deployments benefit from UEM platforms like Scalefusion, which allow centralized policy enforcement, remote updates, and consistent kiosk experiences across sites.
6. How do I exit kiosk mode in Windows 11 when the device is locked?
To exit kiosk mode in Windows 11, press Ctrl + Alt + Delete and sign in using an administrator account. If the device is fully locked or auto-logged in, admin access or remote device management is required. Centralized tools can simplify kiosk recovery without onsite intervention.

