
When you think of enterprise tools that hold your company’s most critical data from sales pipelines to customer records, Salesforce probably sits near the top of the list. It’s the digital core of many organizations. But with so many users logging in daily, across different teams and devices, managing access securely can be tricky.
That’s where Salesforce SSO (Single Sign-On) steps in. Instead of employees juggling multiple passwords or relying on insecure logins, SSO allows them to use one verified identity across all their apps.
This guide will walk you through everything you need to know about Salesforce single sign on, including how to set up Salesforce SSO using Scalefusion OneIdP, a secure identity management platform designed to simplify access and enforce zero-trust principles.
Why Enable SSO for Salesforce?
Salesforce is the hub of business operations for sales, marketing, support, and leadership teams. But with so much sensitive customer and company data stored in one place, password-based access alone just doesn’t cut it anymore.
Without SSO, companies face a few recurring problems:
- Employees reuse passwords across different tools, increasing the risk of credential theft.
- IT teams spend hours resetting forgotten passwords.
- Offboarding a user can take days, leaving security gaps behind.
By enabling Salesforce SSO, companies centralize authentication and reduce those risks. Instead of users logging in directly to Salesforce, they authenticate through a trusted Identity Provider (IdP) such as Scalefusion OneIdP, which verifies who they are before granting access.
This setup means:
- Only verified users on compliant devices can access Salesforce.
- Login activity is easier to monitor and audit.
- The user experience improves as one login grants access to all necessary apps.
In short, Salesforce single sign on enhances both security and convenience, keeping business operations smooth without compromising safety.
Benefits of Enabling Salesforce SSO
Here are some clear benefits of enabling Salesforce SSO for your organization:
- One Login for All Apps: With Salesforce login with SSO, employees no longer need to remember multiple usernames and passwords. A single login through the identity provider gets them into Salesforce, along with other connected business apps like Slack, Dropbox, or HubSpot.
- Centralized Access Control: Admins can view and manage who can access Salesforce from one place. If a team member leaves, access can be revoked instantly from the identity dashboard, no need to log into multiple tools.
- Consistent Security Policies: By enabling Salesforce single sign on, you can enforce the same authentication rules across every user and device. Whether it’s MFA, passwordless login, or device-based verification, these policies apply automatically.
- Fewer Password-Related Issues: With fewer credentials to remember, users are less likely to forget passwords or fall for phishing attacks. This drastically reduces helpdesk requests for password resets.
- Compliance and Audit Readiness: Every Salesforce sign in with an SSO event can be tracked. IT teams get a complete audit trail of who accessed what, when, and from which device, making compliance reporting much simpler.
Simply put, enabling SSO for Salesforce brings together security, compliance, and ease of use in one seamless workflow.
How Does Salesforce SSO Work?
The Salesforce SSO setup works by creating a secure trust relationship between Salesforce (the Service Provider) and Scalefusion OneIdP (the Identity Provider).
Here’s the basic flow:
- A user tries to sign in with SSO Salesforce from a browser or mobile app.
- Salesforce redirects the login request to the identity provider (OneIdP).
- OneIdP verifies the user’s identity either through a password, biometric check, or passwordless method.
- Once authenticated, the user is automatically logged in to Salesforce, no additional credentials needed.
Behind the scenes, this authentication uses SAML 2.0 or OIDC (OpenID Connect), ensuring secure, encrypted communication between both platforms.
So, instead of managing dozens of passwords, users have one identity managed centrally while IT teams maintain full visibility and control.
Step-by-Step Guide: Configure SSO for Salesforce
Before you begin the setup Salesforce SSO process, make sure the following are ready:
- Your custom domain has been verified in Scalefusion OneIdP.
- All Salesforce users have been added to the Scalefusion Dashboard and migrated to OneIdP.
- You have Salesforce admin privileges.
- Users are also added to the Salesforce portal.
Once you have completed these checks, you are ready to configure Salesforce SSO using Scalefusion OneIdP.
Here’s a visual interactive demo of the set up process.
Now, let’s walk through the Salesforce SSO setup process step by step.
Step 1: Create the SSO Configuration in Scalefusion
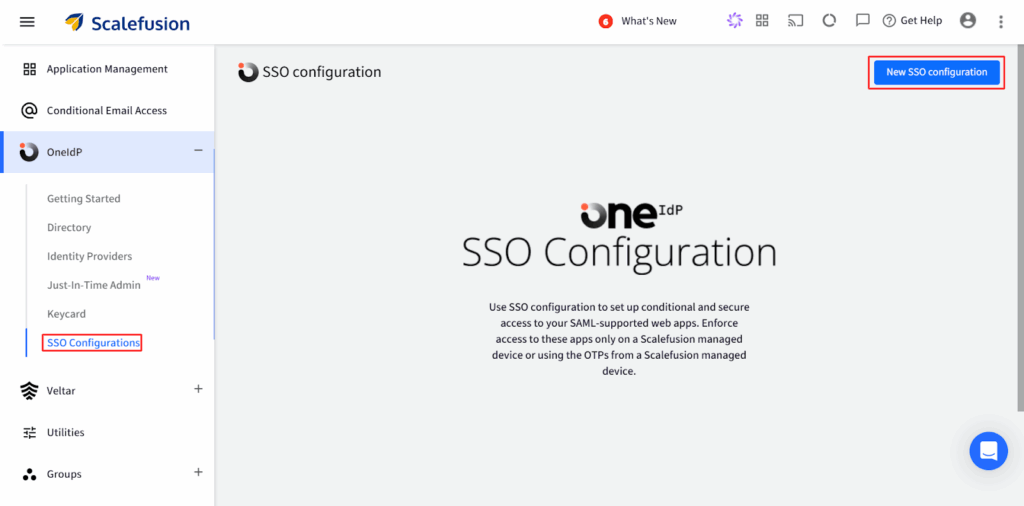
- Log in to the Scalefusion Dashboard → go to OneIdP > SSO Configuration.
- Click New SSO Configuration on the top right.
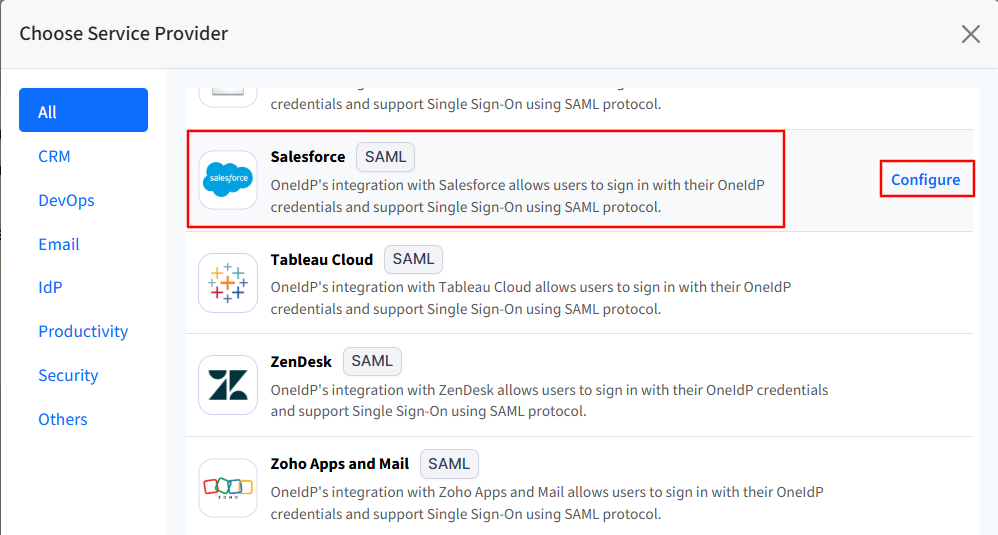
- Search for Salesforce, select it, and click Configure.
- The setup wizard will open with the following tabs:
- Application Basics
- SSO Scope Management
- Permissions
- SSO Settings
- Conditional Access
- User Facing Messages
- Complete each section one by one. You can only move forward after finishing the current tab.
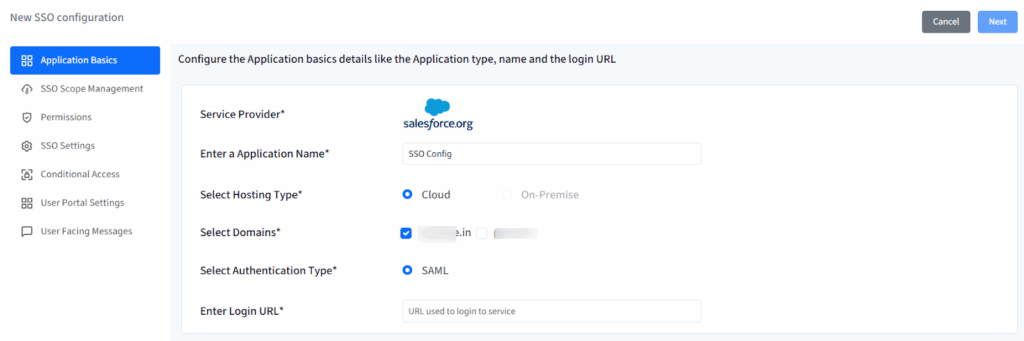
Step 2: Application Basics
Enter the base details for your Salesforce setup:
- Application Name: Enter a name to identify this configuration (5–128 characters).
- Hosting Type: Automatically set as Cloud.
- Domains: Choose your verified OneIdP domain(s).
- Authentication Type: Automatically set as SAML.
- Login URL: Enter the Salesforce login URL.
Click Next when done.
Step 3: SSO Scope Management
This section defines who can use SSO and how their sessions are managed.
User Assignment:
- Allow all users imported to Scalefusion: Grants access to all domain users migrated to OneIdP.
- Allow only assigned users: Only users assigned manually will be able to access Salesforce via SSO.
Revoke Access for All Users Once Saved:
- Logs out all currently assigned users after saving changes.

Enforcement Rules:
- Logout on user assignment.
- Logout on user un-assignment.
- Logout when this SSO configuration is deleted.
Click Next to continue.

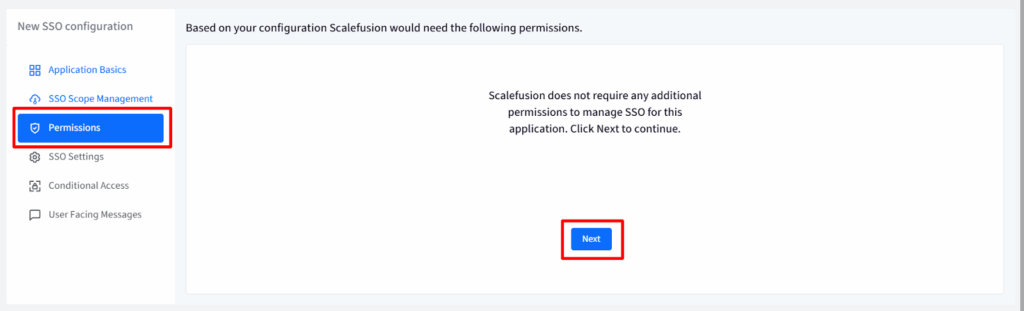
Step 4: Permissions
No additional permissions are needed for Salesforce. Click Next.
Step 5: SSO Settings
This section lets you configure Salesforce as a Service Provider and link it with OneIdP using SAML-based settings.
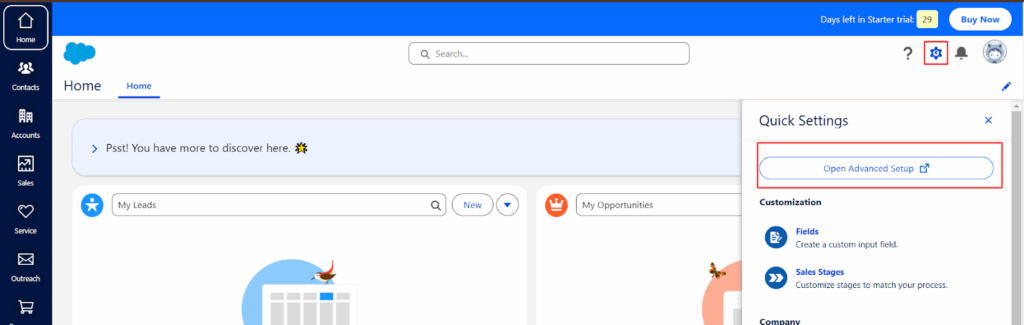
Configure in Salesforce
- Log in to your Salesforce Admin Console → navigate to Settings > Open Advanced Settings (this opens in a new tab).
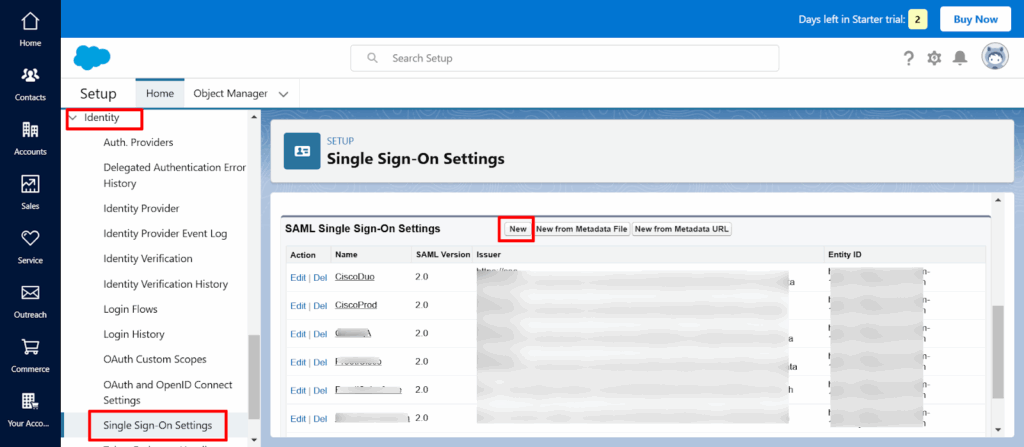
- In the left panel, search for Identity → click Single Sign-On Settings → click New under SAML Single Sign-On Settings.
- In the SAML setup form, enter the following details:
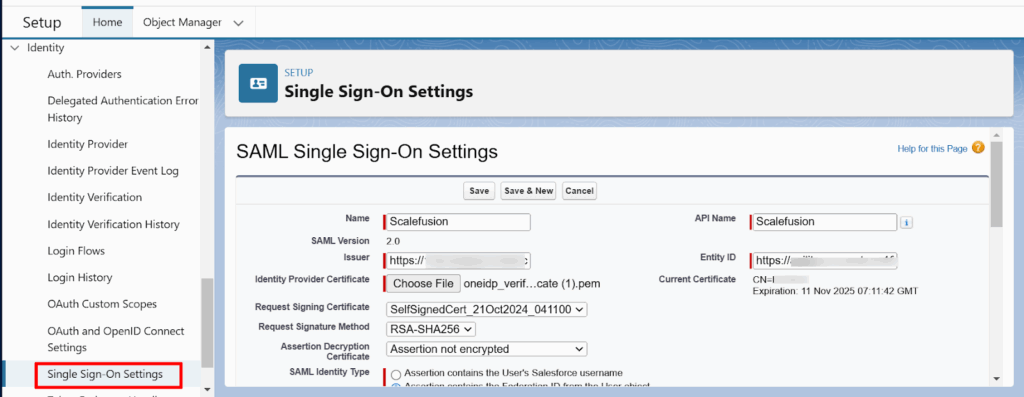
- Name: Enter a name for your configuration.
- API Name: You can use the same name.
- Issuer: Copy the OneIdP Entity ID / Issuer URL from Scalefusion (under SSO Settings) and paste it here.
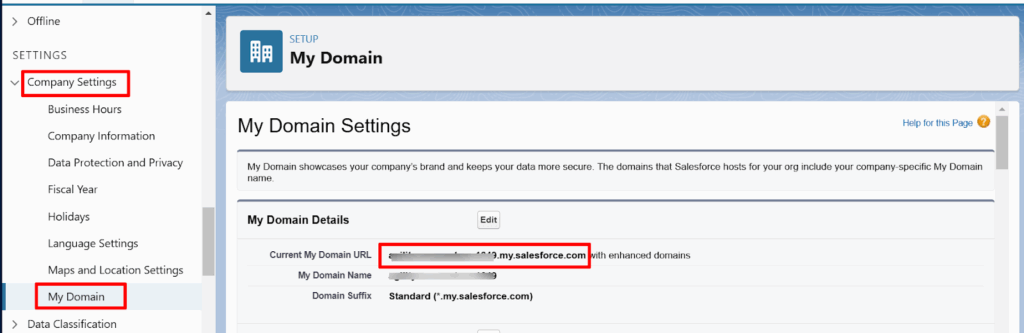
- Entity ID: Copy your Current My Domain URL from Salesforce (Settings > Company Settings > My Domain) and paste it here.
Make sure the Entity ID starts with https://
- Identity Provider Certificate: Download the Verification Certificate from Scalefusion Dashboard (SSO Settings) and upload it.
- Identity Provider Login URL: Copy the OneIdP SSO URL from Scalefusion and paste it here.
- SAML Identity Type: Select Assertion contains the User’s Salesforce username.
- Service Provider Initiated Request Binding: Select HTTP Redirect.
- Check Single Logout Enabled.
- Identity Provider Single Logout URL: Copy the OneIdP SLO URL from Scalefusion and paste it here.
- Click Save to complete the setup.
- Return to the Scalefusion Dashboard and click Next to continue.
Step 6: Conditional Access
Conditional Access lets you control how and from which devices or browsers users access Salesforce through SSO.
Device Policy
For Android, iOS/iPadOS, Windows, macOS, Linux, and ChromeOS, choose:
- Only if the device is managed by Scalefusion: Users can log in only from managed devices.
- If device is managed or OTP from managed device:
- Managed devices log in directly.
- Unmanaged devices require OTP from the Scalefusion Authenticator app on a managed device.
- Managed devices log in directly.
- Allow MFA/OTP via third-party app or email: Enabled only if Multi-Factor Authentication (MFA) is turned on in Directory Settings.
- Skip Password on Managed Devices: Lets users on managed devices log in without entering a password (except ChromeOS).
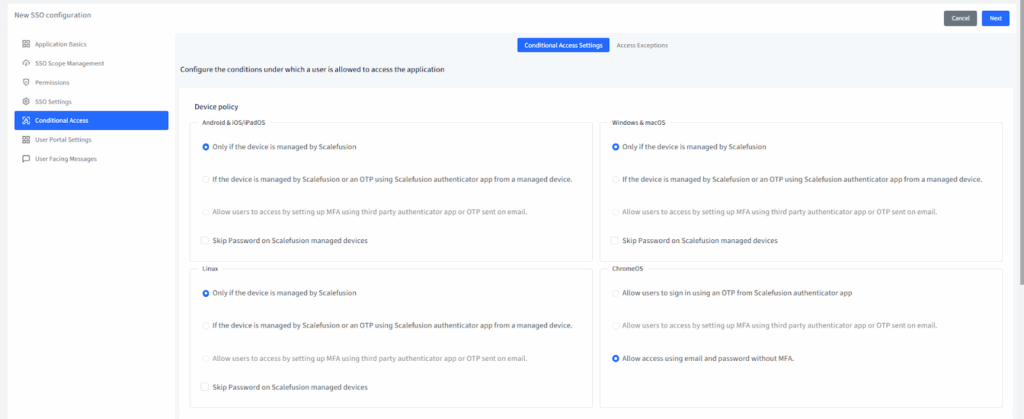
You can configure different device rules for Android/iOS on the left and Windows/macOS/Linux/ChromeOS on the right.
Browser Policy
Define which browsers users can use to access Salesforce:
- Allow all browsers (default), or
- Restrict to specific browsers like Chrome, Edge, Safari, or Firefox, with a minimum version requirement.
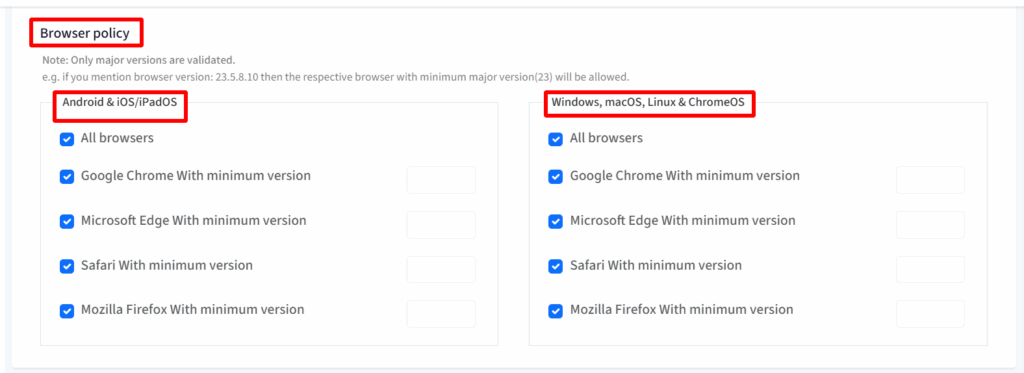
Only the major version number is validated (for example, setting 23.5.8.10 allows version 23 and above).
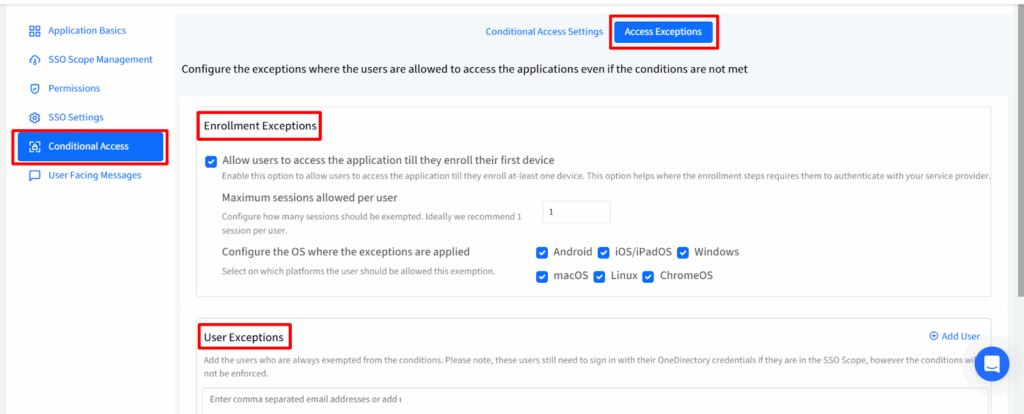
Access Exceptions
You can allow exceptions for specific cases:
- Enrollment Exceptions:
- Allow users to log in until they enroll their first device.
- Limit the number of allowed sessions per user (1–3).
- Choose which operating systems this rule applies to.
- User Exceptions:
- Add user email addresses or select users who can skip Conditional Access policies.
- These users still need to sign in via OneIdP but won’t be blocked by device/browser restrictions.
Click Next when done.
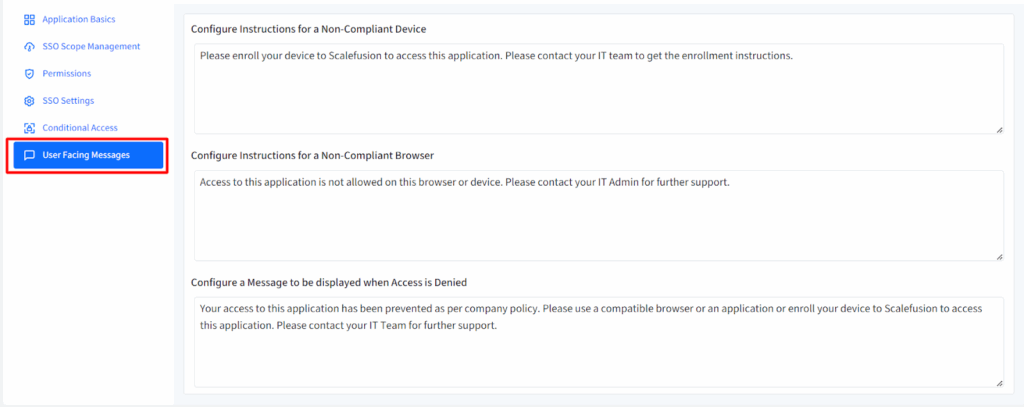
Step 7: User Facing Messages
Create or edit messages shown to users when access is denied or conditions aren’t met:
- Non-Compliant Device: Explain how to enroll their device.
- Non-Compliant Browser: Tell users which browsers are supported.
- Access Denied: A general message for blocked access.
You can customize these messages or use defaults. Click Save when done.
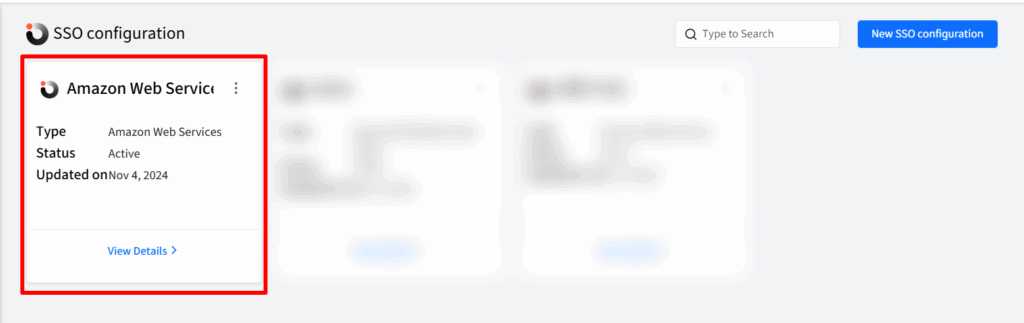
The SSO configuration is created and listed on the SSO Configuration page as a separate card with the name you have defined. You can create multiple SSO configurations in the same manner.
Step 8: User Login into Salesforce after SSO Configuration
Before users can log in, you must enable the SSO configuration in Authentication Configuration.
Enable SSO in Salesforce
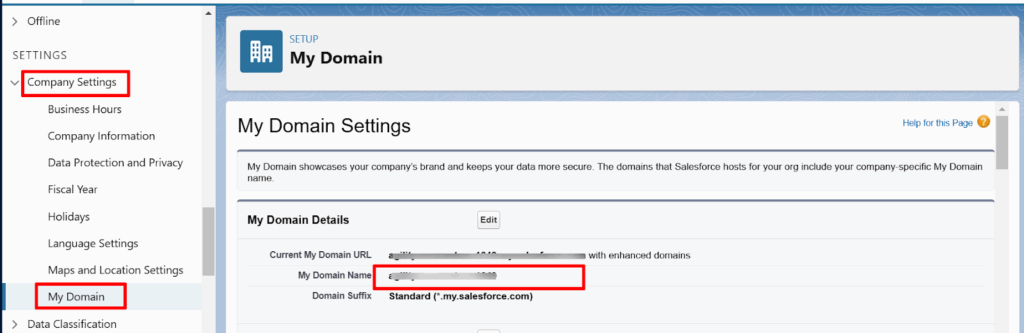
- In Salesforce Admin Console, go to Settings > Company Settings > My Domain.
- Scroll down to Authentication Configuration and click Edit.

- Check the box next to your SSO configuration under Authentication Service.
- Ensure Login Page Type is set to Standard and Login Form is enabled.
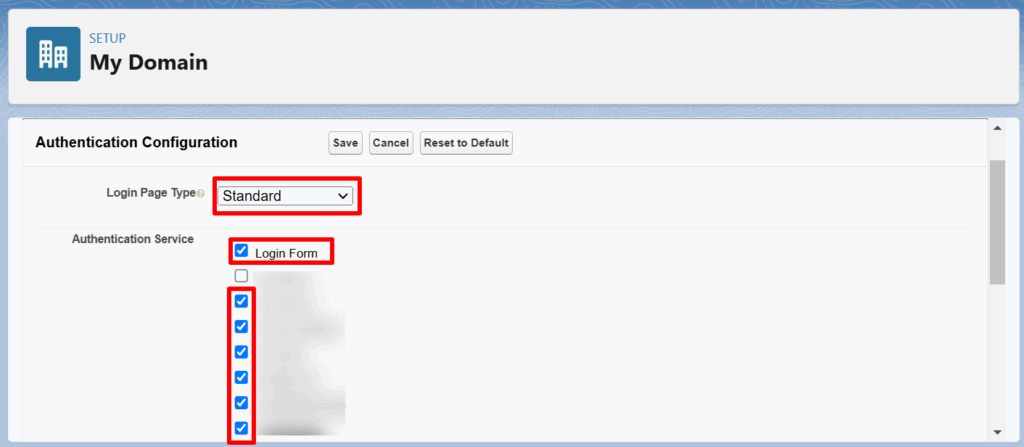
- Click Save.
This enables your SSO configuration for login.
Logging In via SSO
- Go to the Salesforce Customer Secure Login Page.
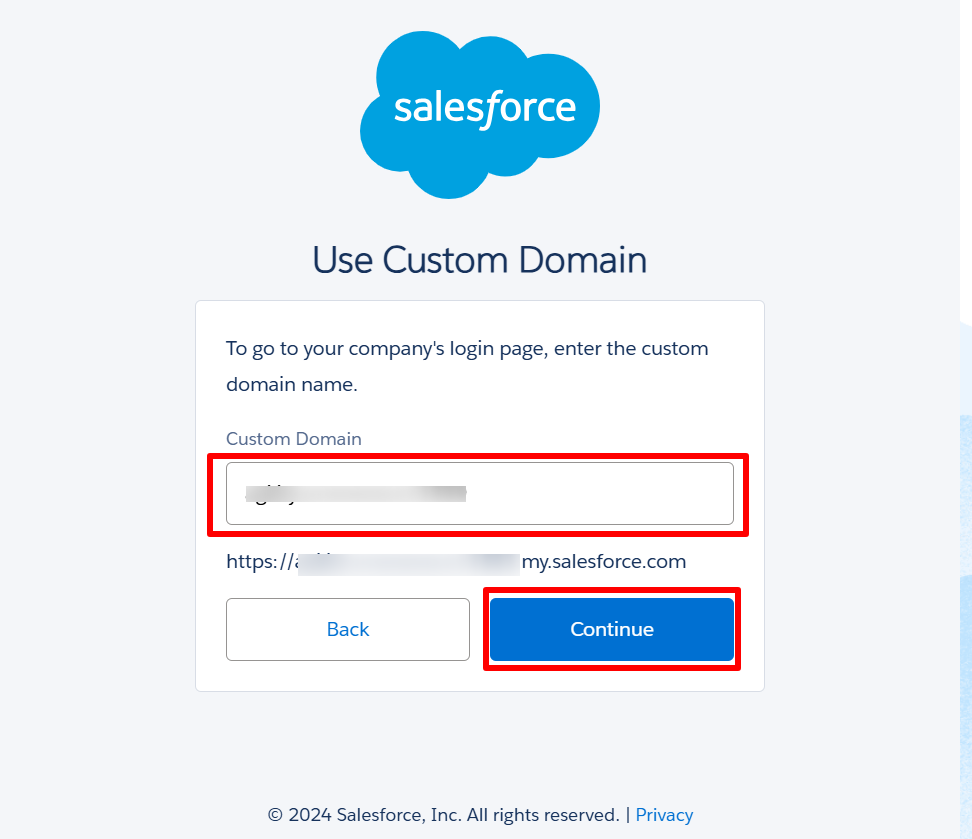
- Click Use Custom Domain.
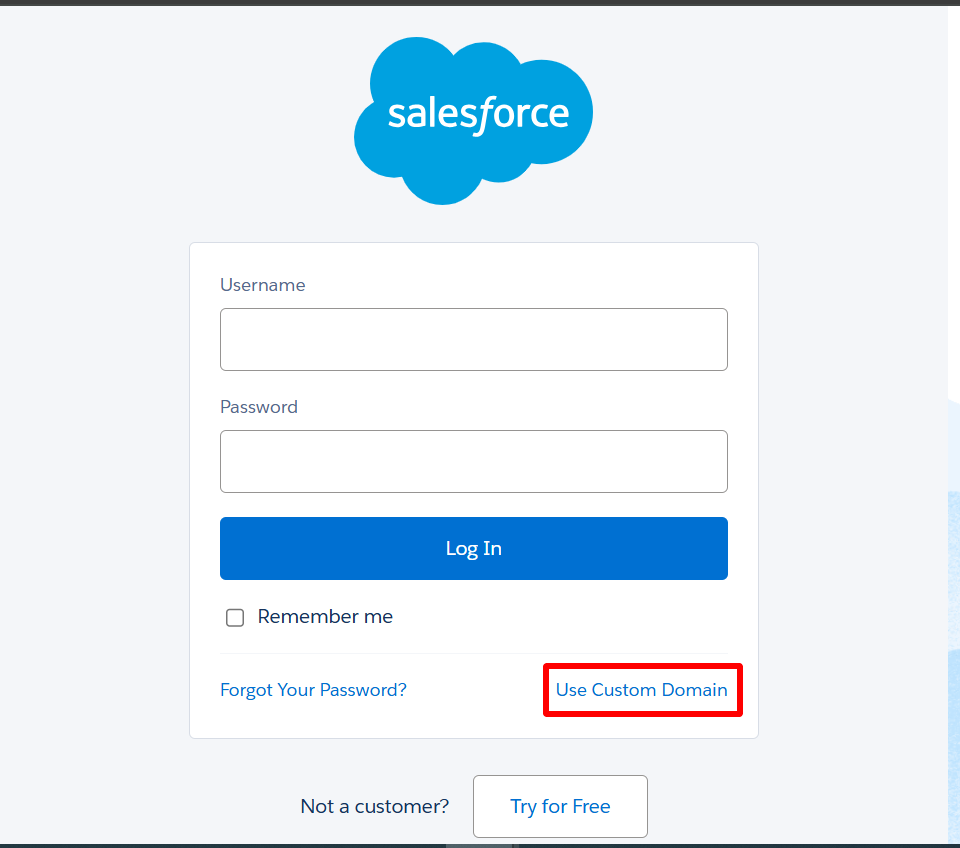
- Enter your company’s custom domain name.
- To find it: In Salesforce, go to Settings > Company Settings > My Domain, then copy the URL under My Domain Name.
- Paste the domain on the Salesforce login page and click Continue.
- On the next page, click Login with a Different Provider.
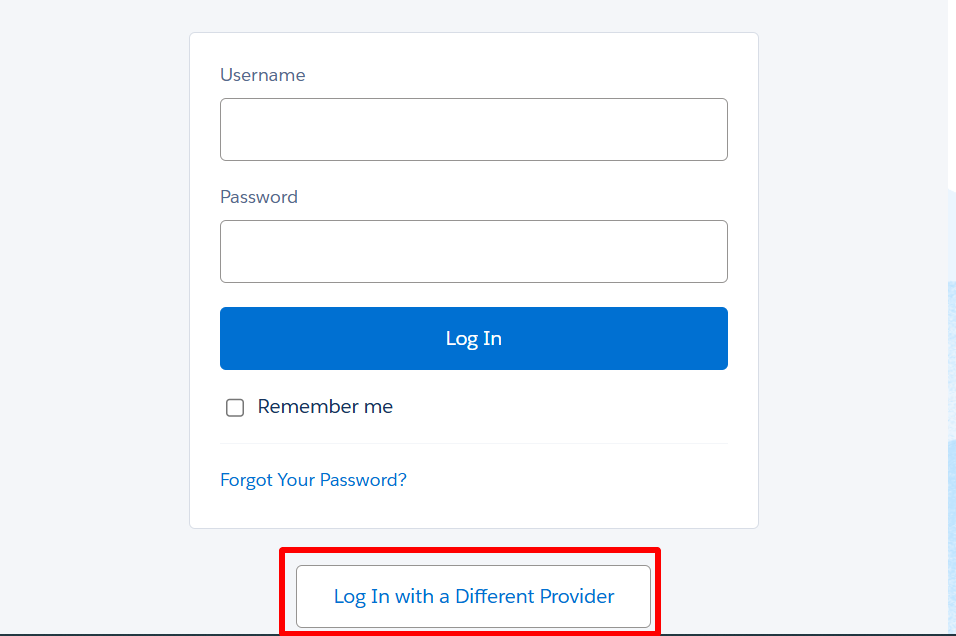
- Select the SSO configuration you created earlier.
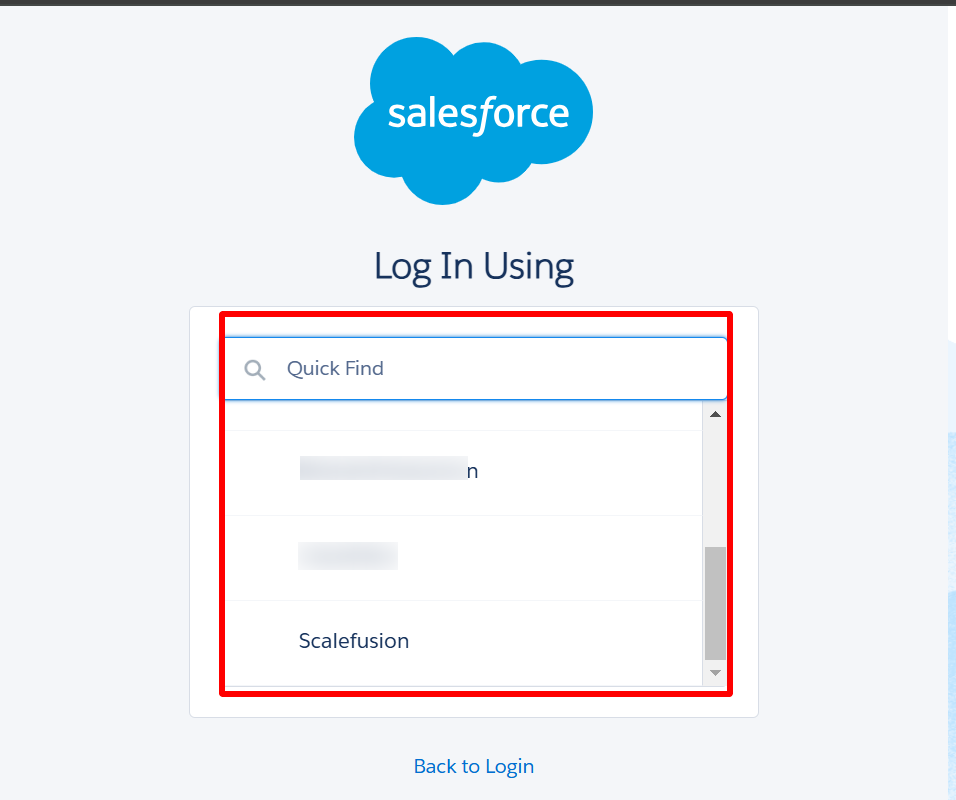
- You’ll be redirected to the OneIdP login page. Enter your OneIdP credentials (added in both Scalefusion and Salesforce). Click Sign In — you’ll now be logged into Salesforce.

Step 9: Synchronizing Users Between Scalefusion and Salesforce
You can automatically sync users between Scalefusion and Salesforce using Salesforce’s built-in provisioning tools.
- In the Salesforce Admin Console, go to Settings > Identity > Single Sign-On Settings.
- Edit the existing SSO configuration you created.
- Under Just-In-Time Provisioning, check the box for User Provisioning Enabled.
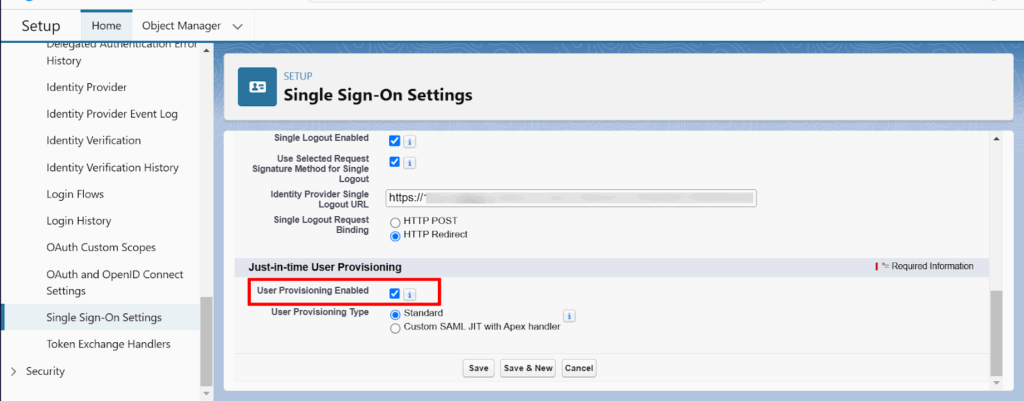
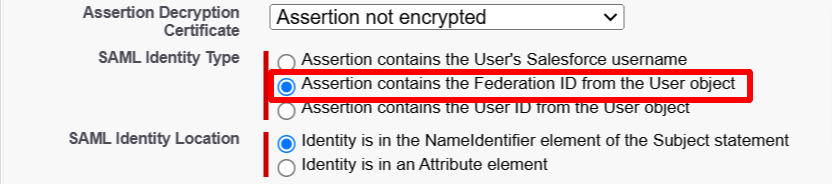
- Select Assertion contains the Federation ID from the User object as the SAML Identity Type.
- Click Save.
Now switch to the Scalefusion Dashboard:
- Open your Salesforce SSO configuration.
- Go to SSO Settings > Custom Attributes and enter the required custom attributes.
Note: The ProfileId should be copied from the Salesforce Admin Console under Administration > Users > Profiles.
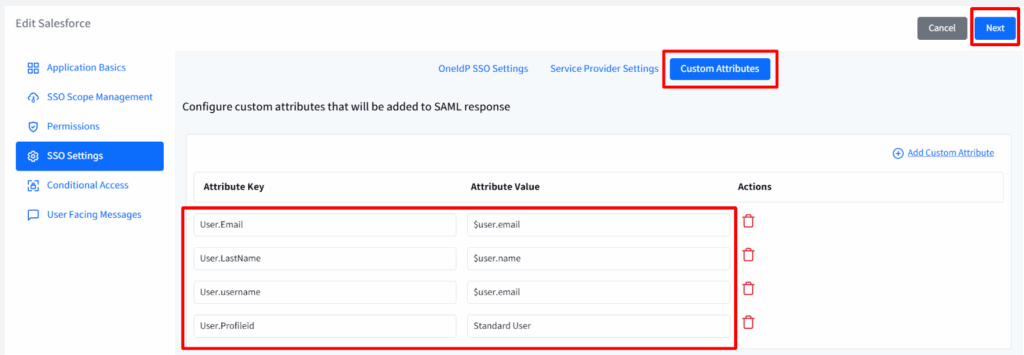
- Save the SSO Configuration.
Now, when a user logs in to Salesforce with their OneIdP credentials for the first time, their account will automatically be created in Salesforce.
Choose Scalefusion OneIdP to Implement SSO for Salesforce
As more teams depend on Salesforce every day, keeping login access safe and easy has become a top priority. That’s exactly what Scalefusion OneIdP helps with.
When you set up Salesforce single sign on through OneIdP, your employees get one simple and secure way to log in. Instead of juggling passwords or worrying about unsafe logins, users can sign in with SSO Salesforce using trusted credentials and IT teams can manage everything from one place.
Here’s how OneIdP makes it easier:
- Passwordless Login: Users can log in through fingerprints, OTPs, or device trust instead of remembering passwords.
- Zero Trust Access: Only verified users on secure devices can reach Salesforce.
- Automatic User Management: New employees get access instantly, and those who leave lose it just as fast, no manual steps needed.
- One Dashboard for Everything: IT can control access to Salesforce and other apps from one clean, simple console.
- Smart Access Policies: Limit Salesforce access by location, device type, or time of day to keep things safer.
In short, Scalefusion OneIdP adds a strong security layer without making logins complicated. It helps you set up Salesforce SSO quickly and keeps every login protected from start to finish. Users get a faster way to access Salesforce, and admins get full control without extra work.
See how Scalefusion OneIdP powers Salesforce SSO for your business.
Sign up for a 14-day free trial now.
Frequently Asked Questions
1. What is Salesforce Single Sign-On (SSO)?
Salesforce Single Sign-On (SSO) is an authentication method that allows users to access Salesforce using a single set of enterprise credentials. Instead of managing separate Salesforce passwords, users are authenticated through a centralized Identity Provider, making login simpler and more secure.
2. Why do enterprises enable SSO for Salesforce?
Enterprises enable Salesforce SSO to centralize user authentication, reduce password-related risks, and simplify access management. It helps IT teams manage users more efficiently while improving security across large teams and departments.
3. Does SSO work outside my corporate firewall?
Yes, Salesforce SSO works outside the corporate firewall. Because authentication is handled through a cloud-based Identity Provider, users can securely access Salesforce from any location without relying on an internal network.
4. How does Salesforce SSO improve overall security posture?
Salesforce SSO improves security by eliminating password-based logins and enforcing centralized authentication policies. This reduces the risk of phishing, credential theft, and unauthorized access while giving IT teams better visibility and control over user access.
5. Is Salesforce SSO considered a best practice for CRM security?
Yes, Salesforce SSO is widely considered a best practice for CRM security. It strengthens authentication, simplifies access control, and supports modern security frameworks, making it ideal for organizations that rely on Salesforce for sensitive customer and business data.
