If your team relies on Okta to connect with business apps every day, you already understand how important a secure and easy login can be. Between managing tools for communication, file sharing, and collaboration, employees often end up juggling too many passwords. For IT teams, that means more password resets, more access issues, and more security gaps.


That’s where SSO for Okta comes into play. Instead of remembering multiple passwords, users can log in once and securely access everything they need. When you configure Okta single sign on using a trusted identity provider like Scalefusion OneIdP, authentication becomes simpler, faster, and far more secure.
This article walks you through why Okta SSO is worth enabling, how it actually works behind the scenes, and how to setup Okta SSO step by step using Scalefusion OneIdP.
Why enable SSO for Okta?
Okta is one of the most widely used tools for connecting employees to cloud-based business apps. But if users have to sign in to Okta and each individual app separately, it defeats the purpose of centralized access. Multiple logins increase risk, create password fatigue, and make IT management harder than it needs to be.
Setting up Okta SSO through OneIdP solves this. It centralizes authentication so users are verified once by the identity provider and then granted access to Okta and all connected apps without additional passwords.
Here’s why organizations prefer to setup Okta SSO:
- Better Security: Authentication is handled by OneIdP before Okta grants access.
- Simpler Login Experience: Users only need one secure Okta login with SSO to reach all their tools.
- Faster Employee Onboarding: New hires can sign in instantly without creating new credentials for every app.
- Easy Offboarding: When an employee leaves, their access is removed everywhere automatically.
- Reduced IT Burden: Fewer password resets mean less time spent on helpdesk tickets.
- Compliance Ready: Every okta sign in with SSO events is logged and auditable for data security audits.
By enabling SSO for Okta, organizations combine convenience and control—giving employees faster access while keeping company data secure.
Benefits of Enabling Okta SSO
Setting up Okta single sign on does more than make logins easier. It strengthens security, improves compliance, and helps IT teams manage access with less effort.
Here are some of the key benefits of enabling SSO for Okta in your organization:
- One Login for All Apps: With Okta SSO, employees use a single verified login to access all their work apps such as CRMs or HR systems without juggling multiple passwords. This saves time and keeps the experience smooth across tools.
- Centralized Access Control: IT admins can manage access from one dashboard instead of jumping between different portals. Granting or revoking permissions for users happens instantly, keeping access organized and consistent.
- Consistent Security Policies: Passwordless authentication, MFA, and device-based checks can be enforced across every app connected to Okta. That means no weak spots or inconsistent rules across departments.
- Reduced Risk of Phishing: Fewer passwords mean fewer chances for phishing or fake login attempts. Since users only authenticate through a single trusted entry point, the overall attack surface stays much smaller.
- Better Compliance: Every okta login with sso event is tracked automatically, making audits easier and helping organizations stay compliant with industry standards.
In short, enabling SSO for Okta keeps security strong while giving employees the smooth, one-step access experience they expect.
How SSO Works with Okta?
To understand how Okta SSO setup works, let’s break down the authentication flow in simple terms.
There are two main components involved:
- Identity Provider (IdP): This is Scalefusion OneIdP, which verifies who the user is.
- Service Provider (SP): This is Okta, which grants users access to their applications.
Here’s what happens when someone tries to sign in with SSO Okta:
- A user goes to the Okta login page.
- Okta redirects them to the Identity Provider (OneIdP) for authentication.
- OneIdP checks credentials through passwordless login, biometrics, or multi-factor authentication.
- Once verified, OneIdP sends a secure SAML or OIDC token back to Okta.
- Okta accepts the token and gives the user access to all assigned applications, no extra passwords required.
Essentially, Scalefusion OneIdP acts as the secure gatekeeper, ensuring both the user and their device are trusted before Okta grants access.
Step-by-Step Guide: Configure SSO for Okta
Ready to setup Okta SSO with Scalefusion OneIdP? Follow these steps.
Before starting your Okta SSO setup, make sure you’ve checked the following:
- The custom domain you want to authorize is verified in OneIdP.
- Users under that domain are added to the Scalefusion Dashboard and migrated to OneIdP.
- You have admin rights for your Okta console.
- The same users are added inside the Okta portal.
Once these are complete, you are ready to connect Okta with OneIdP.
Step 1: Create SSO in Scalefusion
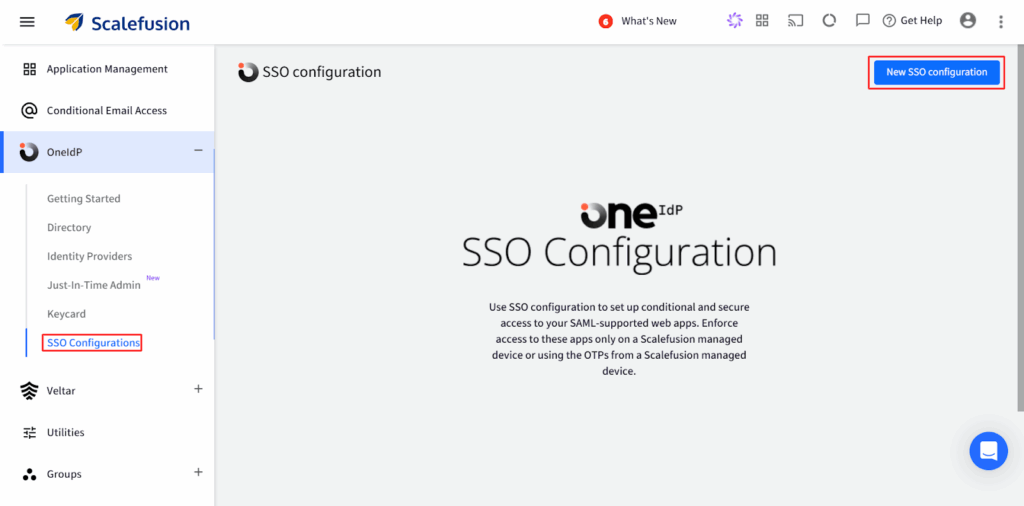
1. Log in to the Scalefusion Dashboard → go to OneIdP > SSO Configuration.
2. Click the New SSO Configuration button on the top right.
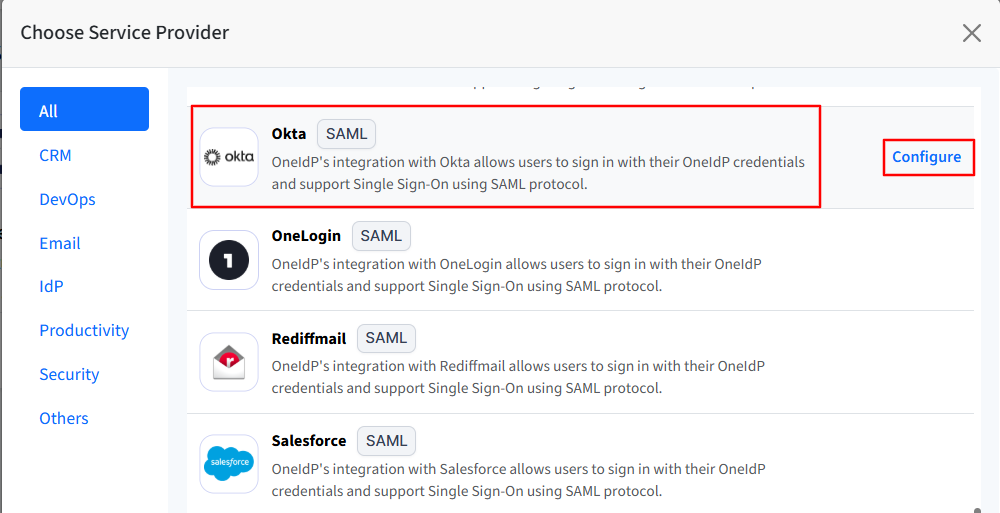
3. Search for Okta in the list, select it, and click Configure.
4. This opens a setup wizard with six tabs:
- Application Basics
- SSO Scope Management
- Permissions
- SSO Settings
- Conditional Access
- User Facing Messages
You need to complete each section in order before moving to the next.
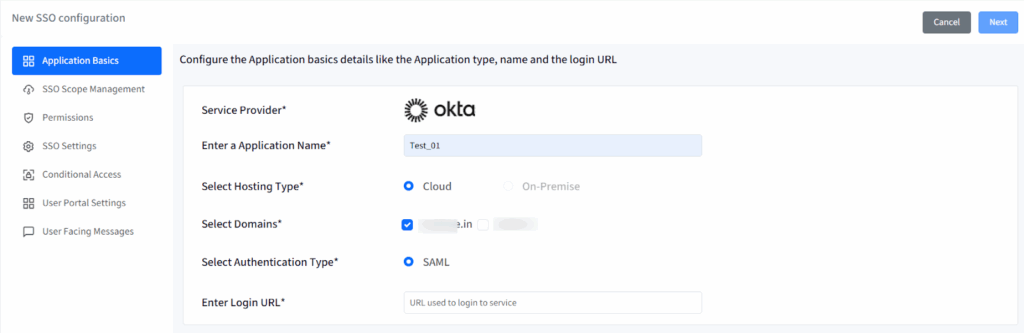
Step 2: Configure Application Basics
This section defines the general details of your SSO connection between Scalefusion and Okta.
- Application Name: Enter a unique name for this configuration (minimum 5 characters, maximum 128).
- Hosting Type: This will be pre-selected as Cloud.
- Domains: All verified domains under OneIdP will be listed here. Select the domain(s) you want to enable for SAML SSO.
- Authentication Type: This will be pre-selected as SAML.
- Login URL: Provide the Okta login URL that users normally access.
Once you’ve entered all details, click Next to continue.

Step 3: Define SSO Scope Management
SSO Scope Management helps determine who can access Okta using SSO and how their sessions are controlled.
User Assignment Options:
- Allow all users imported to Scalefusion — all users from the verified domain who are migrated to OneIdP can log in through SSO.
- Allow only assigned users — restrict access only to specific users you assign after configuration.
Revoke Access on Save:
- If enabled, all existing sessions under this configuration are immediately logged out when you click Save.

Enforcement Rules:
These rules control when sessions are automatically invalidated:
- Logout immediately on user assignment (after any grace period, if applied).
- Logout immediately on user un-assignment.
- Logout immediately on deleting the configuration.

Note: For Okta, deleting an SSO configuration will not automatically log out users already signed in.
After setting up scope and enforcement, click Next.
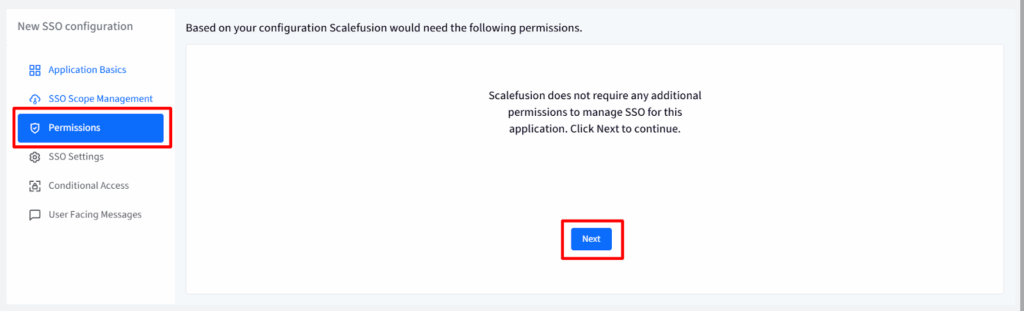
Step 4: Configure Permissions
No extra permissions are required for Okta. Simply click Next to proceed.
Step 5: SSO Settings
This section allows administrators to configure the Service Provider (Okta) settings and obtain the SSO URLs that need to be added to the Okta Admin Console.
Under OneIdP SSO Settings, you’ll see configuration details such as the Issuer URL, SSO URL, and Certificate, which are required to complete the setup on the Okta side.
There are two ways Okta can use OneIdP for authentication:
- Factor Only: Okta treats OneIdP as a possession factor, meaning it acts as an additional layer of authentication (like MFA).
- SSO Only: Okta treats OneIdP as the primary login method and uses it as the main credential to sign users in.
Once the configuration is completed on the Okta Admin Console, return to the Scalefusion Dashboard and click Next to proceed.
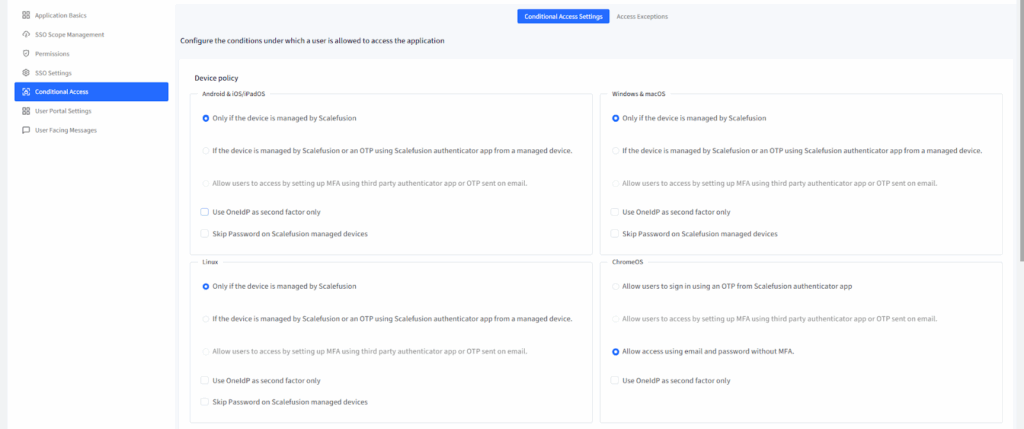
Step 6: Apply Conditional Access (Optional but Recommended)
Conditional Access allows IT admins to enforce device and browser-based login policies, ensuring that only compliant users and devices can access Okta through SSO.
Device Policy
For Android, iOS/iPadOS, Windows, macOS, Linux, and ChromeOS devices, choose one of the following:
- Only if the device is managed by Scalefusion — access Okta only from Scalefusion-enrolled devices.
- If managed by Scalefusion or OTP on unmanaged — allow access if:
- The device is managed (direct login), or
- The device is unmanaged but verified via OTP from the Scalefusion Authenticator app.
- The device is managed (direct login), or
- Allow via MFA/OTP — enforce MFA or OTP verification (only works if MFA is enabled in Directory Settings).
- Use OneIdP as second factor only — allows OneIdP to act as an additional verification layer after primary login.
- Skip Password on managed devices — allows users to skip entering passwords on managed devices (except ChromeOS).
Note: The “Skip Password” feature will be disabled automatically if “Use OneIdP as second factor only” is enabled.

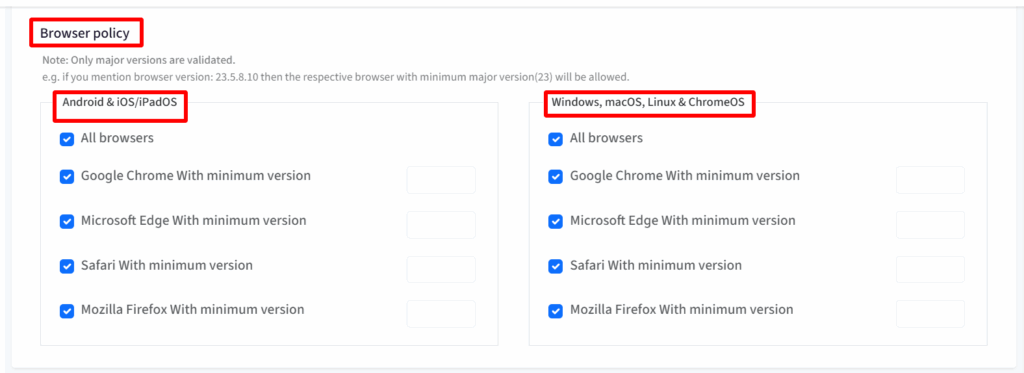
Browser Policy
You can allow or restrict browser access based on your organization’s requirements:
- Allow all browsers (default).
- Restrict access to specific browsers (Chrome, Edge, Safari, Firefox) with defined minimum versions.
- Only major versions are validated (for example, version 23.5.8.10 = version 23+).
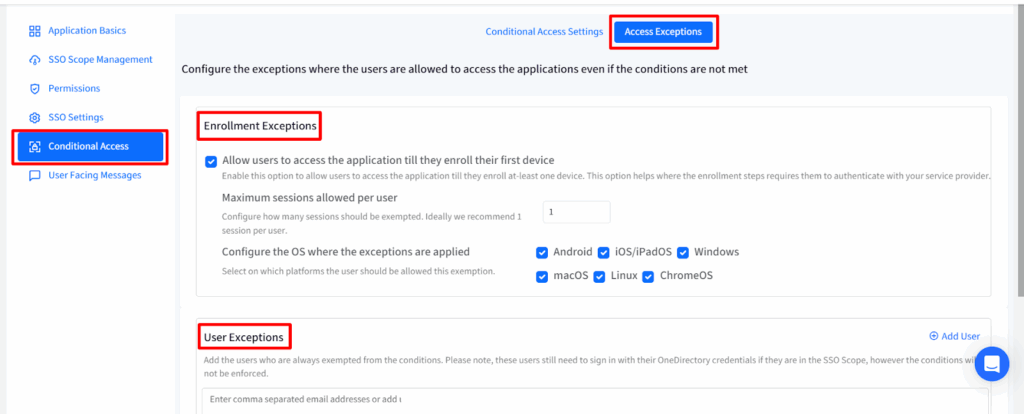
Access Exceptions
Exceptions allow limited access even if conditions are not met:
- Enrollment Exceptions:
- Let users access Okta until they enroll their first device.
- Limit sessions per user (1–3 recommended).
- Specify which OS platforms this applies to.
- User Exceptions:
- Add specific users (by email) who can bypass device/browser restrictions but still authenticate through OneIdP.
After setting your Conditional Access policies, click Next.
Step 7: Customize User Messages
User Facing Messages help admins create clear instructions for end users when access is blocked.
You can customize messages for the following:
- Non-Compliant Device: Shown when the user’s device isn’t enrolled or doesn’t meet policy requirements.
- Non-Compliant Browser: Displayed when the user’s browser is outdated or unsupported.
- Access Denied: Shown for any other access restriction.
Scalefusion provides default messages which you can edit to better fit your organization’s tone and policies.
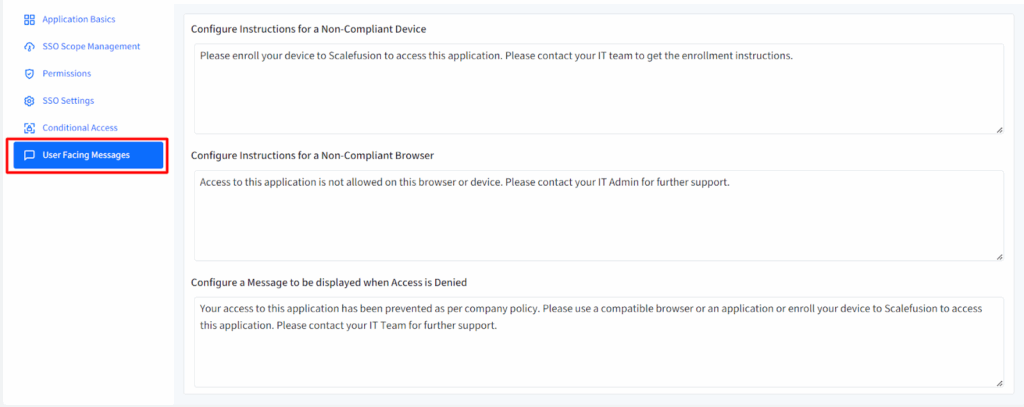
After making updates, click Save.
Step 8: Configure Okta for Factor Only
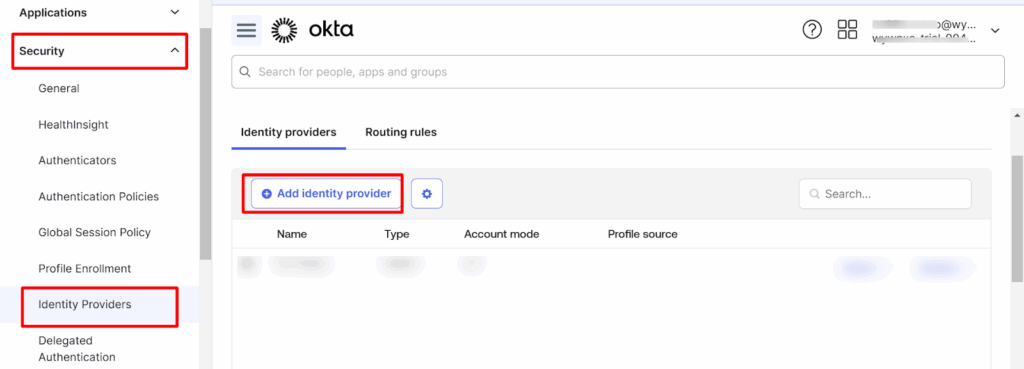
- In the Okta Admin Console, go to Security > Identity Providers.
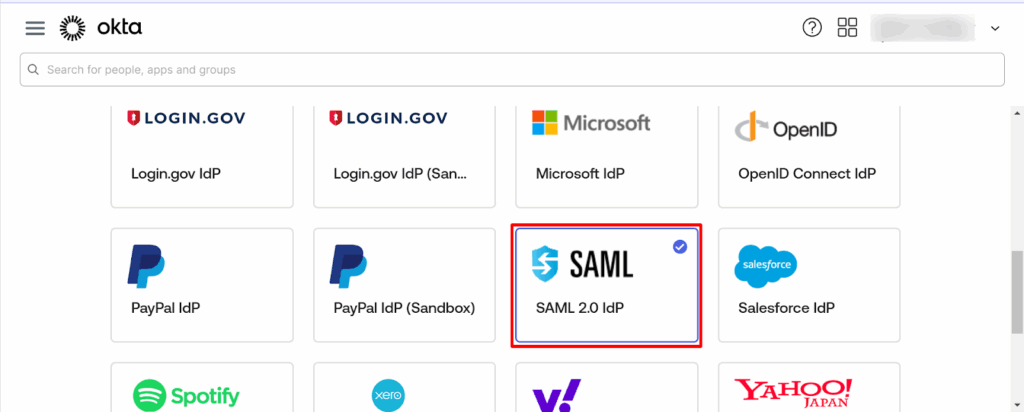
- Click Add Identity Provider.

- Under Select Identity Provider, choose SAML 2.0 and click Next.
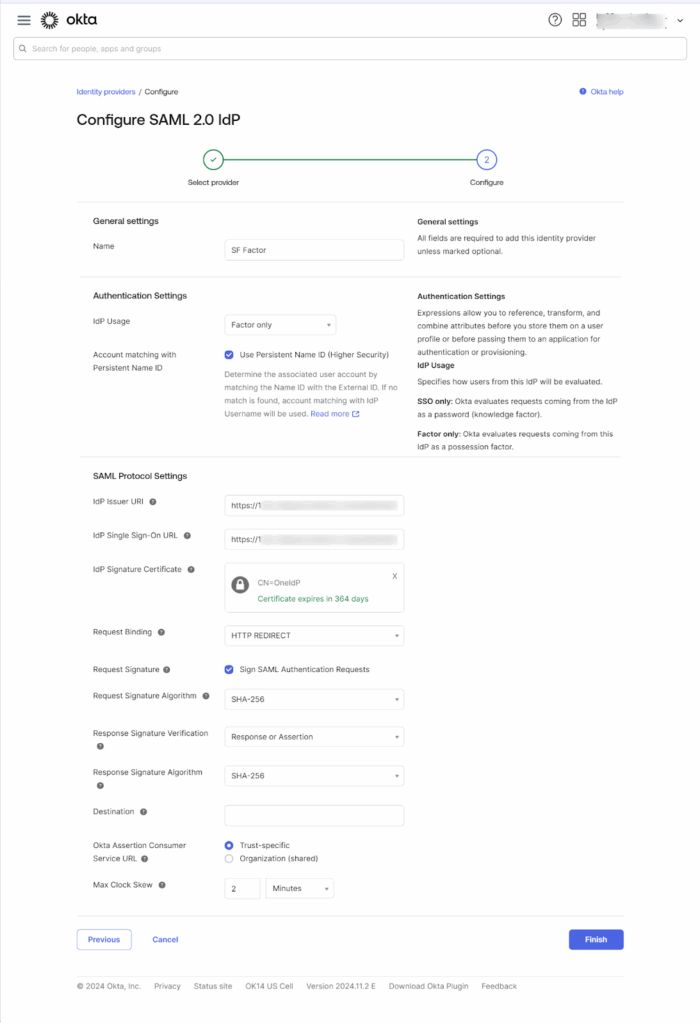
- Enter the following details:
- Name: Enter a name for the configuration.
- IDP Usage: Select Factor Only.
- SAML Protocol Settings:
- Issuer URI: Copy the OneIdP Entity ID/Issuer URL from the Scalefusion Dashboard (SSO Settings).
- IdP Single Sign-On URL: Copy the OneIdP SSO URL from the Scalefusion Dashboard.
- IdP Signature Certificate: Download the Verification Certificate from Scalefusion and upload it in Okta.
- Request Binding: Select HTTP Redirect.
- Issuer URI: Copy the OneIdP Entity ID/Issuer URL from the Scalefusion Dashboard (SSO Settings).
- Name: Enter a name for the configuration.
- Click Finish to save.
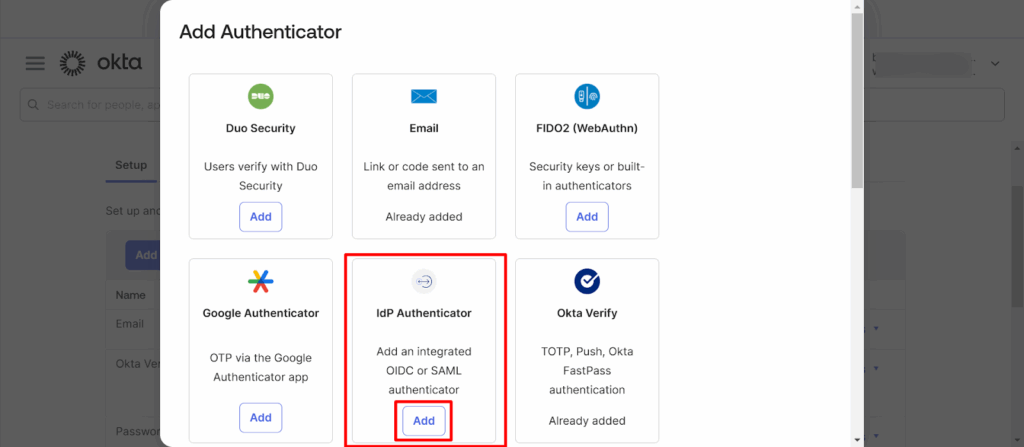
- Go to Security > Authenticators → click Add Authenticator.

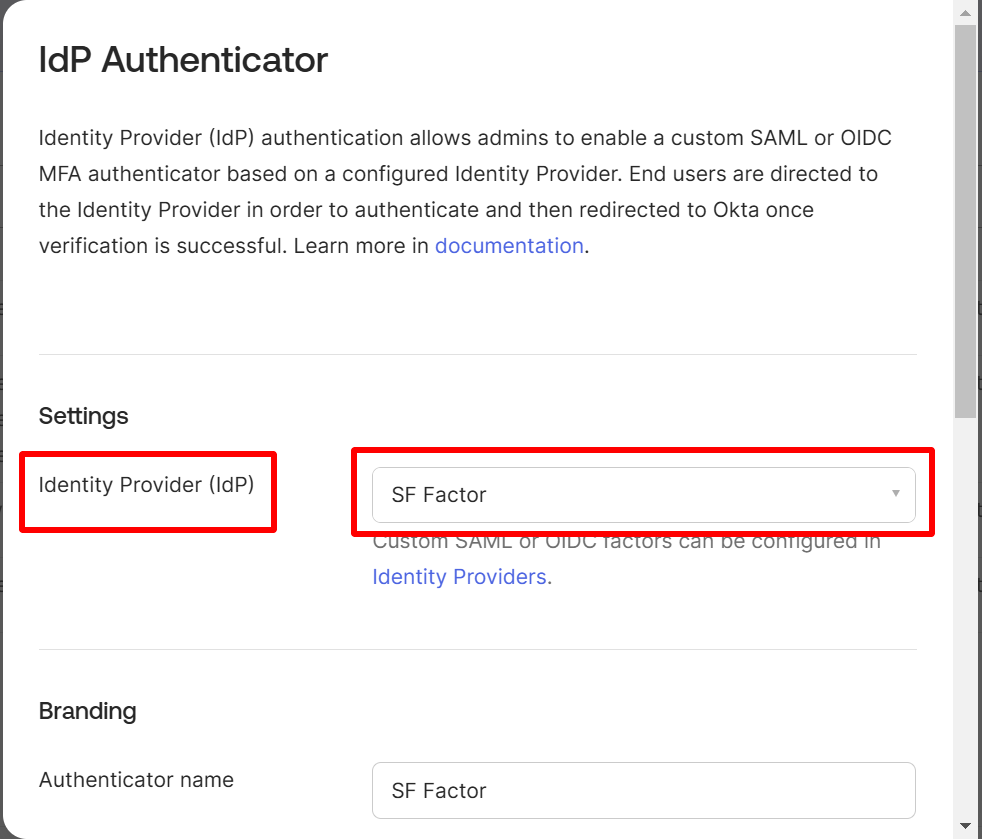
- Under the IdP Authenticator section, click Add.
- Choose the Identity Provider created above and click Save.
- Navigate to Security > Authentication Policies → click Okta Dashboard.
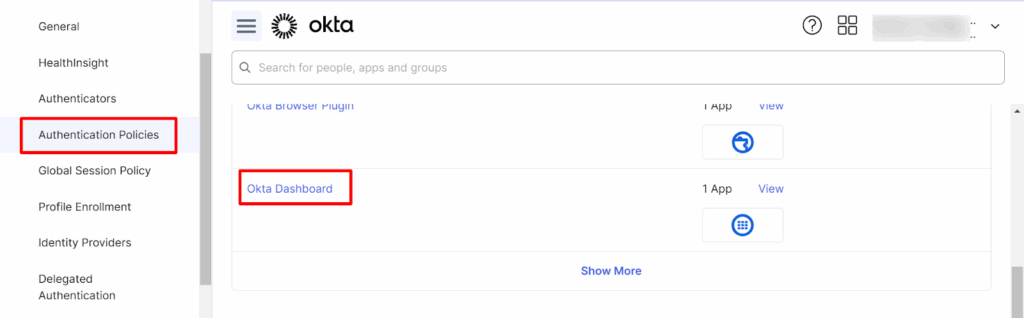
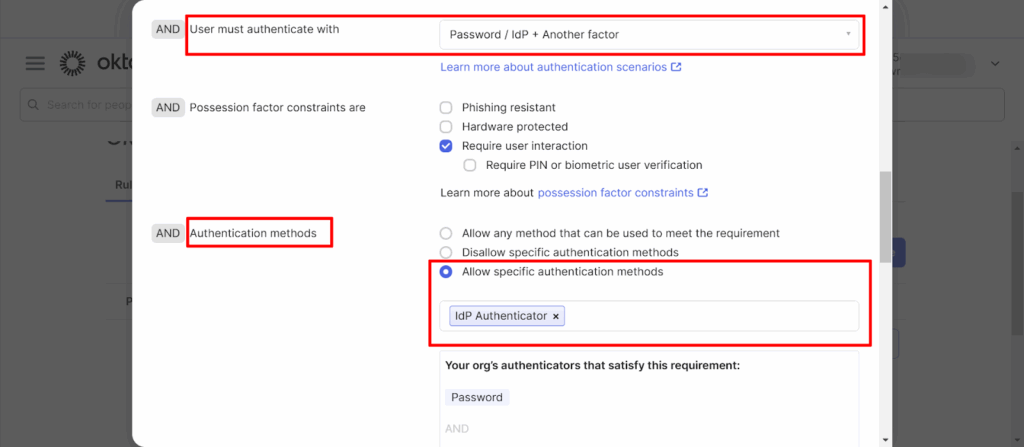
- Click Actions > Edit, then configure:
- User must authenticate with: Select Password / IDP + another factor.
- Authentication Methods: Select Allow specific authentication methods and choose IdP Authenticator.
- User must authenticate with: Select Password / IDP + another factor.
- Click Save.
- Go to Security > Authenticators > Enrollment tab, click Edit under Actions.
- For the IdP created, set Required, then click Update Policy.

User Login to Okta with Factor Only
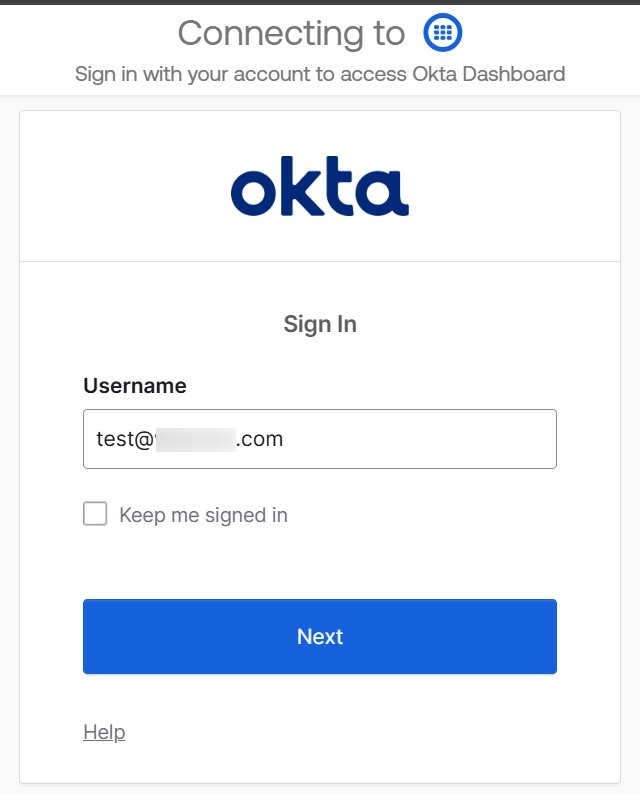
- Go to the Okta login page and enter your organization URL.
- Enter your Okta username and password.
- You’ll be asked to verify using the configuration created on the Okta console — click Verify.
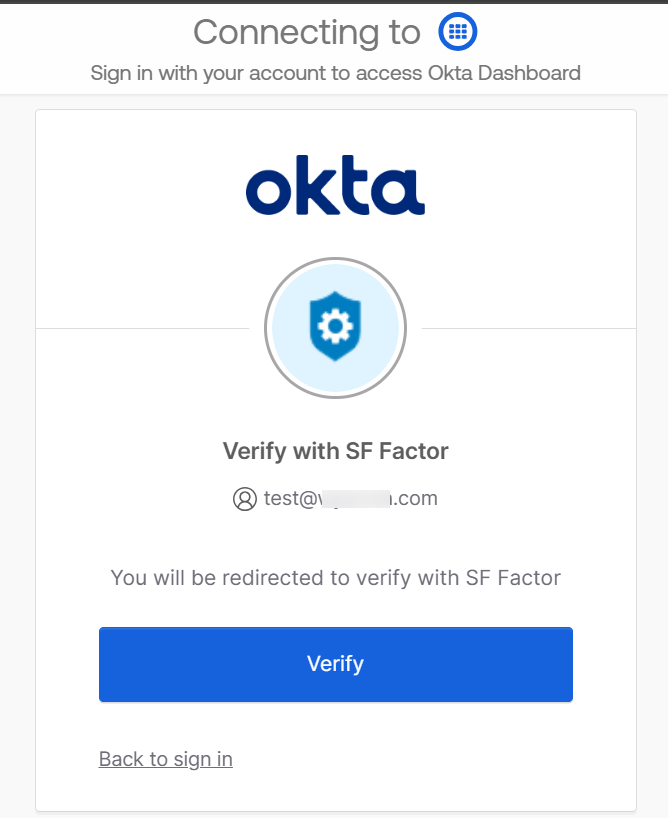
- You’ll be redirected to the OneIdP page for compliance check.

- Enter your OneIdP credentials and click Sign In.
Note: If “Use OneIdP as second factor only” is enabled in Conditional Access, you won’t be redirected to the OneIdP login page.
OneIdP will automatically check compliance and log you into Okta.
You should now be logged in to Okta.
Configure Okta for SSO Only
- In the Okta Admin Console, go to Security > Identity Providers.
- Click Add Identity Provider.
- Under Select Identity Provider, choose SAML 2.0 and click Next.

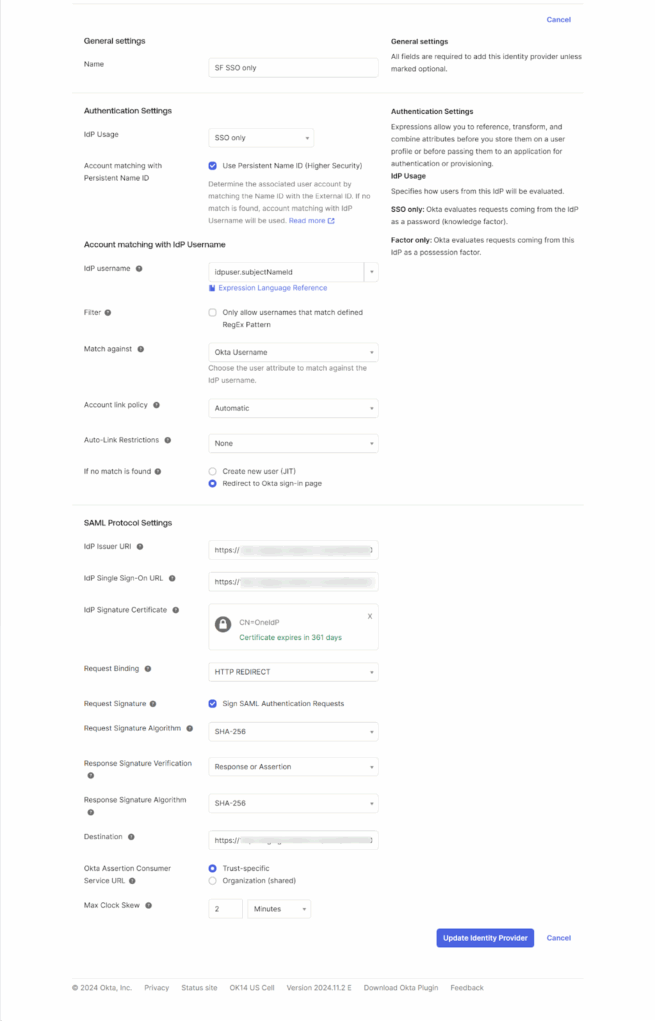
- Enter the following details:
- Name: Enter a name for the configuration.
- IDP Usage: Select SSO Only.
- Account Matching with IdP Username:
- IdP Username: Select idpuser.subjectNameId.
- Account Link Policy: Select Automatic.
- IdP Username: Select idpuser.subjectNameId.
- SAML Protocol Settings:
- Issuer URI: Copy the OneIdP Entity ID/Issuer URL from the Scalefusion Dashboard.
- IdP Single Sign-On URL: Copy the OneIdP SSO URL.
- IdP Signature Certificate: Download the Verification Certificate from Scalefusion and upload it in Okta.
- Request Binding: Select HTTP Redirect.
- Issuer URI: Copy the OneIdP Entity ID/Issuer URL from the Scalefusion Dashboard.
- Name: Enter a name for the configuration.
- Click Finish.
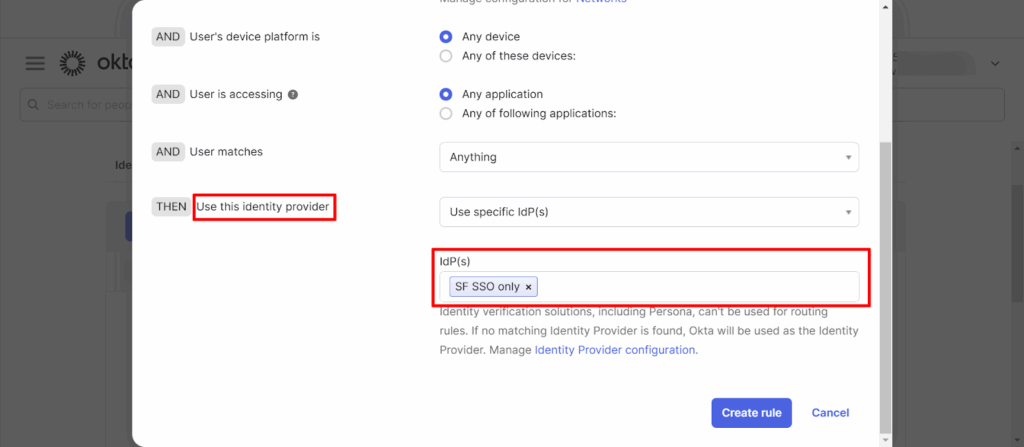
- Go to Identity Providers > Routing Rules and click Add Routing Rule.
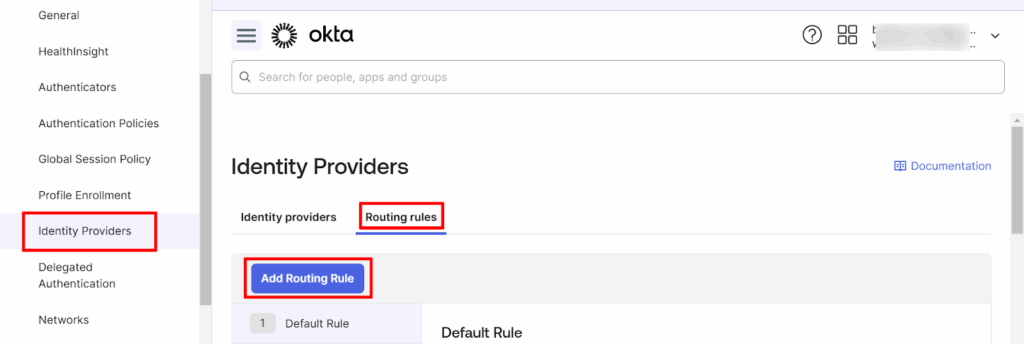
- Select the identity provider you created and click Create Rule.
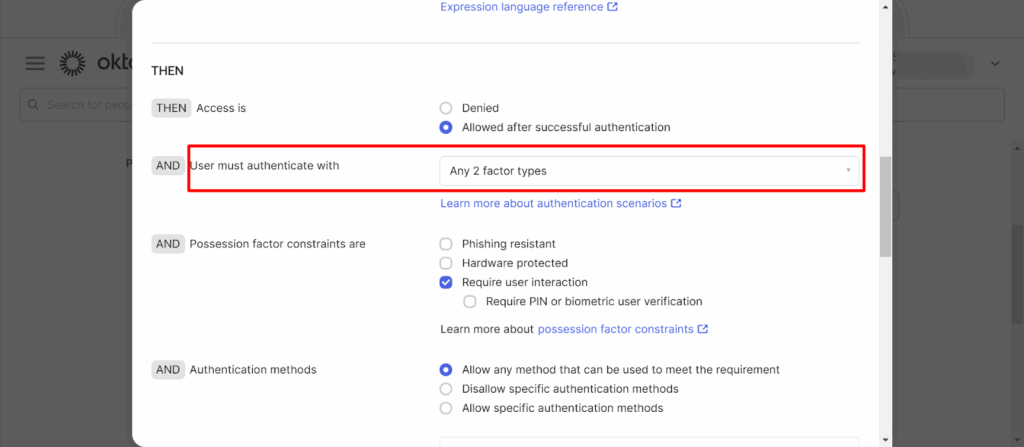
- Navigate to Security > Authentication Policies → click Okta Dashboard.
- Click Actions > Edit.
- Under User must authenticate with, select Any two factors.
User Login to Okta with SSO Only
- Go to the Okta login page and enter your organization URL.
- Okta will automatically redirect you to the OneIdP login page.
- Enter your OneIdP credentials and click Sign In.

- Once verified, you’ll be logged into Okta.
Note: Once SSO for Okta is configured, it applies to all user accounts — including administrator accounts.
Admins will also need to log in using OneIdP.
Synchronize Users Between Scalefusion and Okta
- In the Okta Admin Console, go to Security > Identity Providers.
- Click Add Identity Provider → select SAML 2.0 → click Next.
- Enter the following:
- Name: Enter a name.
- IDP Usage: Select SSO Only.
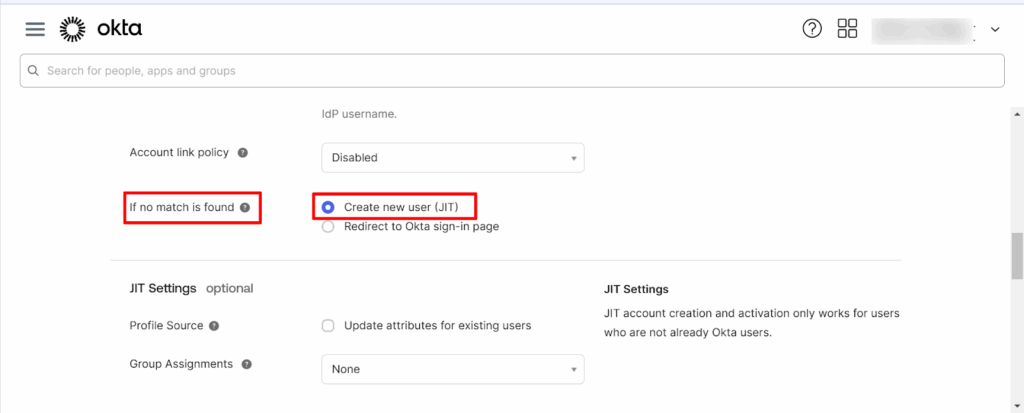
- Under If no match found, enable Create New User (JIT).
- Name: Enter a name.
- Click Finish.
- Go to the Scalefusion Dashboard, open the Okta SSO Configuration.
- Navigate to SSO Settings > Custom Attributes and add the required custom attributes.
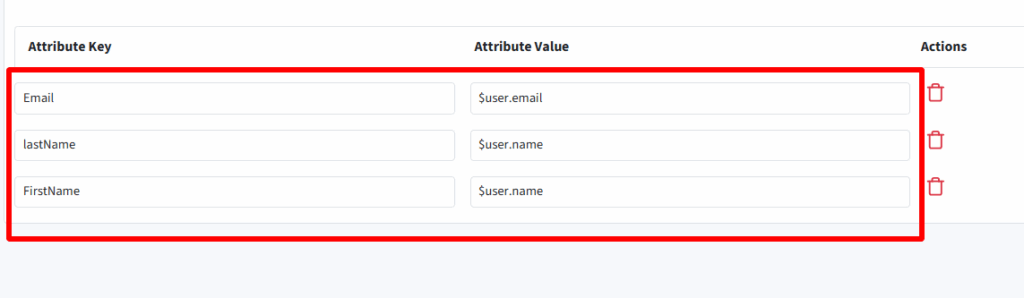
- Click Save.
Now, when a user logs in to Okta using OneIdP for the first time, the same user will automatically be added to the Okta portal.
Done! Your Okta environment is now secured with OneIdP SSO.
Users can log in seamlessly using OneIdP credentials, and IT admins can manage access policies, compliance rules, and user sync, all from a single console.
Seamlessly Configure SSO for Okta with Scalefusion OneIdP
Enabling SSO for Okta is one of the simplest yet most powerful steps toward building a secure digital workspace. It reduces login friction for users and gives IT full visibility over who accesses what and when.
With Scalefusion OneIdP, admins can take this even further by automating onboarding, enabling passwordless access, and enforcing Zero Trust across every device and app. Instead of users juggling passwords, one secure okta login with sso gives them instant access to everything they need.
For IT teams, it’s fewer manual processes, stronger compliance, and total control from a single pane of glass.
How OneIdP Enhances Okta SSO?
- Passwordless Access: Use OTPs, biometrics, or push notifications instead of passwords.
- Centralized Identity Management: Control all user accounts, apps, and devices from a single dashboard.
- Zero Trust Enforcement: Verify both user identity and device posture before granting access.
- SCIM Provisioning: Automate user creation and removal to prevent outdated accounts.
- Device-Based Access Rules: Allow only compliant devices to sign in with SSO Okta and block risky endpoints.
Together, Okta and Scalefusion OneIdP help organizations achieve a secure, frictionless authentication experience that users actually like.
See how Scalefusion OneIdP can power Okta single sign on for your business.
Schedule a demo with our experts today!
Frequently Asked Questions
1. How does Okta Single Sign-On improve login security?
Okta Single Sign-On improves login security by centralizing authentication through a trusted identity platform. It reduces reliance on multiple passwords and helps prevent phishing, credential reuse, and unauthorized access by enforcing secure login policies.
2. Who should use Okta SSO integration?
Okta SSO integration is ideal for organizations managing multiple applications, remote or hybrid teams, and enterprise environments that require centralized identity and access management with stronger security controls.
3. Can Okta SSO be used for cloud and on-premise applications?
Yes, Okta SSO can be used for both cloud-based and on-premise applications. It supports hybrid IT environments by providing a single authentication method across SaaS tools and internal systems.
4. Can Okta SSO integration support zero-trust security models?
Yes, Okta SSO integration supports zero-trust security models by verifying user identity before granting access, regardless of location or network. Every login request is authenticated through centralized policies.
5. How does Okta SSO integration simplify identity lifecycle management?
Okta SSO integration simplifies identity lifecycle management by allowing IT teams to centrally manage user onboarding, role changes, and offboarding. Access can be granted or revoked instantly, reducing security risks and administrative effort.
