

Android multi-app kiosk mode restricts a smartphone, tablet, or rugged device to a predefined set of approved applications while blocking users from accessing unauthorized apps, settings, and device functions. To set up multi-app kiosk mode on Android at scale, IT teams typically enroll company-owned devices as managed or dedicated devices and apply a kiosk policy through an MDM/UEM platform.
Key Takeaways
Android multi-app kiosk mode provides several business apps without giving users unrestricted access to the entire Android device.
- Controlled app access: Users can open only the applications, web apps, and resources approved by IT.
- More flexible than single-app mode: Employees can switch between several work apps instead of being locked into one application.
- Designed for managed devices: Enterprise deployments commonly use fully managed or dedicated Android devices with centralized policies.
- More than app allowlisting: Admins should also configure navigation, Settings access, notifications, permissions, updates, and kiosk-exit controls.
- Useful across industries: Retail, logistics, healthcare, education, hospitality, and frontline teams commonly need multi-app workflows.

What Is Multi-App Kiosk Mode on Android?
Multi-app kiosk mode on Android is a managed configuration that gives users access to a specific set of approved applications while restricting the rest of the device. Users can move between those approved apps, but they cannot freely open other apps or modify protected Android settings.
For example, a warehouse tablet might expose only four tools:
- inventory management
- barcode scanning
- navigation
- employee communication
The worker can switch between all four without gaining normal access to games, social apps, the Play Store, or sensitive system controls.
Google describes these scenarios under dedicated devices, a category of fully managed Android devices intended to perform a defined set of tasks. Dedicated devices can be configured around one application or a set of applications.
How Does Android Multi-App Kiosk Mode Work?
Multi-app kiosk mode works by combining device management policies, approved applications, restrictions, and a controlled launcher.
Instead of displaying Android’s normal home screen and complete app drawer, the device can present a purpose-built home screen containing only the resources users need. Apps outside that approved environment remain unavailable or hidden.
Google’s Android Management API, for example, supports a custom kiosk launcher that can expose multiple force-installed applications from the home screen. Google for Developers
The exact implementation varies by MDM/UEM provider and Android version, but the model is essentially:
Enroll device → define apps → configure restrictions → present controlled launcher → deploy policy.
Single-App vs. Multi-App Kiosk Mode
Both configurations lock down Android devices, but they solve different problems.
| Feature | Single-App Kiosk | Multi-App Kiosk |
|---|---|---|
| Available apps | One | Multiple approved apps |
| App switching | No | Yes, between approved apps |
| Typical interface | App launches directly | Controlled launcher/home screen |
| Best for | Digital signage, check-in, ordering | Frontline, classrooms, warehouses |
| Workflow complexity | One task | Several related tasks |
| Device flexibility | Very limited | Controlled flexibility |
A restaurant ordering station that runs one ordering application fits single-app mode. A store associate who needs a POS app, inventory scanner and internal browser needs multi-app mode.
What Do You Need Before You Set Up Multi-App Kiosk Mode on Android?
For enterprise deployments, prepare the device-management foundation before building the kiosk profile.
Fully managed or dedicated Android devices
For the strongest device-level controls, organizations commonly use company-owned devices provisioned through Android Enterprise as fully managed or dedicated devices. Google notes that fully managed deployments provide broader device-level management controls than work profiles. Google for Developers
Approved business applications
Decide exactly what each role needs.
Don’t stop at the obvious foreground apps. Check whether those apps depend on:
- authentication services
- keyboards
- barcode-scanner services
- file pickers
- location services
- printing software
- VPN clients
A kiosk can look perfectly configured yet fail when a hidden dependency gets blocked.
MDM/UEM or kiosk management software
Android supplies the enterprise management capabilities, while an MDM/UEM platform gives IT teams a practical console for provisioning devices, distributing apps, applying restrictions, and changing configurations remotely.

How to Set Up Multi-App Kiosk Mode on Android
To enable multi-app kiosk mode in Android, enroll the device into your management platform, create a kiosk profile, allow the required apps, configure a restricted launcher and device controls, and deploy the policy to the target devices.
The exact menu names vary between platforms, but the workflow is generally the same.
Step 1: Enroll the Android devices
Enroll company-owned devices into your MDM/UEM environment using the supported Android Enterprise provisioning method.
Depending on your deployment, provisioning may use mechanisms such as QR-code enrollment or zero-touch enrollment. Google includes these options within its dedicated-device management requirements. Google for Developers
Step 2: Create an Android kiosk profile
From the management console, create a device profile or policy for Android and select the kiosk/dedicated-device configuration.
Give the profile a recognizable name such as Warehouse Multi-App Kiosk rather than something generic like “Android Policy 4.”
That small detail helps when dozens of policies exist later.
Step 3: Select multi-app kiosk mode
Choose Multi-App Kiosk, Multi-Application Kiosk, or the equivalent launcher option offered by the management platform.
This tells the device that users should be able to move between several approved apps instead of remaining inside one application.
Step 4: Choose the approved apps
Add every application required for the workflow.
A retail configuration, for instance, might contain:
- POS
- inventory management
- barcode scanner
- Microsoft Teams
- an approved business browser
Everything else can remain unavailable to the end user.
Step 5: Configure the kiosk launcher
The launcher becomes the controlled home screen.
Depending on your management platform, you may be able to:
- arrange application icons
- hide selected background apps
- organize apps into folders
- set wallpaper or branding
- control icon size
- create web shortcuts
- define a default application
Keep the layout simple. A warehouse worker wearing gloves should not have to hunt across four home-screen pages for the scanner app.
Step 6: Restrict Android settings and system controls
This is where a basic app list becomes a proper kiosk deployment.
Consider whether users should be able to access:
- Android Settings
- notification/status bar
- Home and Recent buttons
- power menu
- screenshots
- USB functions
- Wi-Fi settings
- Bluetooth
- volume controls
- factory reset options
The right configuration depends on the workflow. A public-facing kiosk needs tighter controls than an employee-operated warehouse scanner.
Step 7: Apply the profile to devices
Assign the finished policy to an individual device or, preferably, a device group.
Using groups lets IT update dozens or thousands of kiosks from the same configuration rather than modifying them one at a time.
Step 8: Test the complete workflow
Don’t test only whether the icons appear.
Try the workflow exactly as the user will:
- reboot the device
- open every allowed app
- switch between apps
- authenticate
- attach a file
- scan a barcode
- open required URLs
- lose and restore network connectivity
- attempt to access Settings
- test the authorized kiosk-exit process
This catches dependency and permission problems before devices reach a store, classroom, hospital, or warehouse.
Which Android Kiosk Settings Should IT Admins Configure?
The ideal kiosk policy balances lockdown with usability.
| Setting | Typical Admin Decision |
|---|---|
| Approved apps | Allow only required work apps |
| System settings | Block or expose limited settings |
| Status bar | Hide for public kiosks; consider limited access for workers |
| Navigation | Restrict based on required app switching |
| App installation | Prevent unauthorized installations |
| Browser access | Allow approved sites only |
| Factory reset | Restrict on managed corporate devices |
| Kiosk exit | Protect with administrative authorization |
| OS/app updates | Schedule and centrally manage |
| Remote support | Enable where operationally required |
Google’s dedicated-device guidance also recommends considering controls such as safe boot, factory reset, screen capture and managed system-update behavior. Google for Developers
Common Use Cases for Multi-App Kiosk Mode on Android
Multi-app kiosk mode works best when a device has one business purpose but that purpose requires several applications.
Common examples include:
- Retail: POS, inventory lookup, product catalog and staff communication.
- Education: Learning apps, digital textbooks, assessment tools and an approved browser.
- Logistics: Navigation, proof of delivery, barcode scanning and dispatch.
- Healthcare: Patient check-in, communication and approved clinical applications.
- Hospitality: Guest check-in, room management, payment and feedback applications.
- Field services: Work orders, maps, documentation and communications.
Android specifically identifies inventory management, field service, transportation, hospitality and customer-facing kiosk scenarios among common dedicated-device applications. Android Developers
Best Practices for Managing Android Multi-App Kiosks
Start with the smallest app set that completes the job. Every additional application introduces permissions, updates, dependencies and another possible route away from the intended workflow.
Also test policies on a small device group before mass deployment. Verify application updates in kiosk mode, define an administrator-only exit method, schedule OS updates outside operating hours, and make remote troubleshooting part of the deployment plan.
Most importantly, design around the user’s task, not simply around what IT can disable.
The best kiosk often feels surprisingly ordinary to the person using it. The complexity is hidden in the policy.
How to set up Android multi-app kiosk mode with Scalefusion
Follow this step-by-step process to configure the settings on the Scalefusion dashboard to experience Android multi-app kiosk mode.
IT teams that use Scalefusion MDM can configure multi-app kiosk mode for managed Android devices with just a few simple steps. The process gets even more simplified as the Scalefusion kiosk software allows admins to create and manage Android device profiles in kiosk mode centrally from its dashboard.
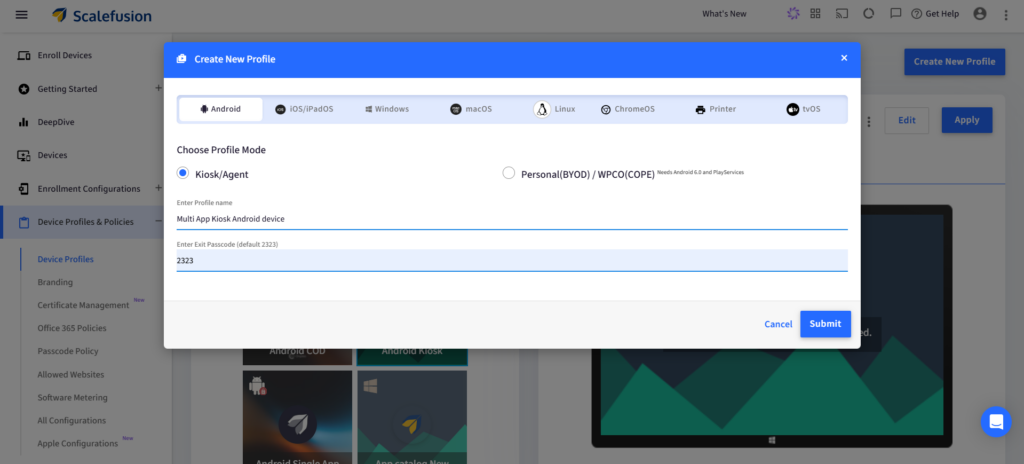
Step 1: Log in to the Scalefusion console. Go to ‘Device Profiles & Policies’ and select ‘Device Profiles.’ Then, choose ‘Create New Profile.’

Step 2: Select ‘Android’ and choose ‘Kiosk/Agent.’ Choose a desired profile name and exit code (if required, other than the default). Click ‘Submit.’
Step 3: Now, select ‘Set Scalefusion as Launcher’. Select and enable the applications you want to run in kiosk mode. There’s also the option of choosing their visibility. Once the desired applications are chosen, click ‘Create Profile.’
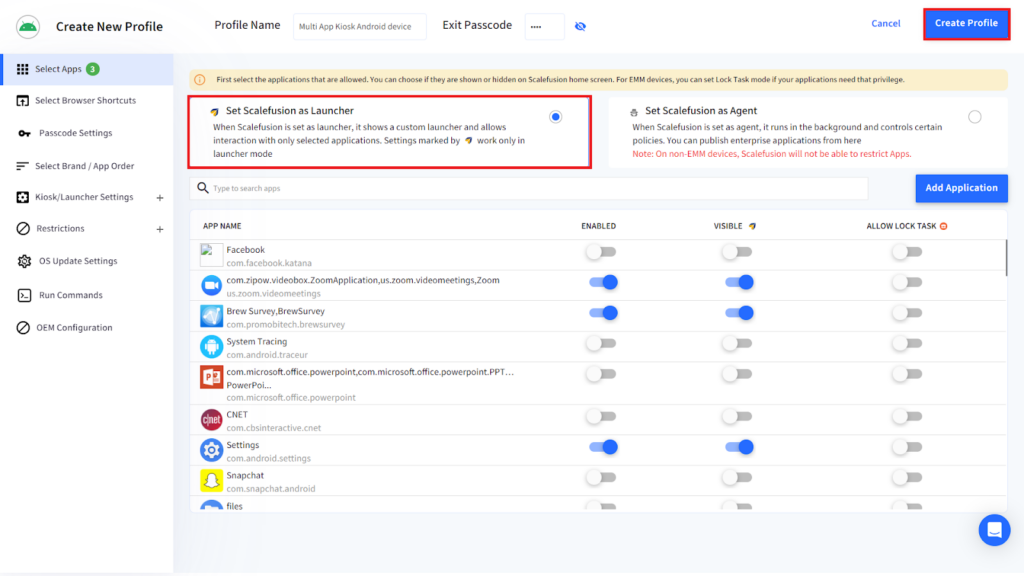
And there you have it. Just three steps and a few clicks to set up a multi-app kiosk mode profile for Android, which can then be applied to multiple enrolled devices. IT admins have the option to change or edit the kiosk mode settings (see the left end of the image above) and add or remove applications for a particular Android multi-app kiosk mode profile.
Conclusion
Android multi-app kiosk mode gives organizations a practical middle ground between an unrestricted Android device and a single-purpose, single-app kiosk. Users can switch between the business tools they genuinely need while IT retains control over applications, system settings and the overall device experience.
The strongest deployments go beyond simply allowlisting several apps. Enroll devices correctly, account for app dependencies, configure the launcher and system controls, test real workflows, and manage updates and troubleshooting centrally. That is what turns an ordinary Android tablet or rugged device into a reliable purpose-built endpoint.
FAQs
1. Can Android devices run multiple apps in kiosk mode?
Yes. Android devices can run multiple approved applications in a managed kiosk environment. A controlled launcher can expose the permitted apps while restricting unauthorized applications and device functions. Google supports dedicated Android devices configured around either individual apps or sets of apps.
2. How do I enable multi-app kiosk mode on Android?
For business deployments, enroll the Android device through an MDM/UEM platform, create a kiosk or dedicated-device policy, choose multi-app mode, add the required applications, configure system restrictions and assign the policy to the device. Menu names vary between management products.
3. Is Android screen pinning the same as kiosk mode?
No. Screen pinning is a user-facing Android feature for keeping one app visible temporarily. Enterprise kiosk mode provides broader administrative control over approved apps, system UI, device settings and exit behavior, particularly on fully managed or dedicated devices.
4. Can users exit multi-app kiosk mode?
Administrators can normally configure a protected method for authorized users or IT staff to leave kiosk mode. End users should not be able to bypass the restrictions through ordinary navigation if the kiosk policy is configured correctly.
5. Can websites be added to an Android multi-app kiosk?
Yes. Depending on the management platform, administrators can add managed web apps, URL shortcuts or a restricted browser alongside native applications. Google’s dedicated-device documentation also supports web-app kiosk scenarios and browser policy restrictions.

