Installing apps and pushing them to desired Android devices will not suffice the need for secure application access. But why so?
While app deployment is an essential first step, configuring the appropriate permissions and settings for each app is critical to ensure both functionality and security. Android’s permission model is designed to protect user data and prevent unauthorized access to device resources.
Without the right configurations, apps can be exposed to security vulnerabilities, misuse of sensitive data, or violations of compliance standards.
Is there any solution to this? Yes, setting up app permissions and configurations the right way. But how?

So lets walk you through the steps required to set up app permissions and configurations on Android. Thus, ensuring that both your devices and applications remain secure and compliant with your organization’s IT policies.
How to configure app permissions on Android devices?
The Android operating system uses a permission-based model that governs how apps interact with device resources such as the camera, microphone, location services, storage, and more. Here are a few methods which allow you to configure these permissions:
Method 1: Access permissions through device settings
Android provides a straightforward way to manage app permissions via the device’s Settings. To configure permissions manually for any app:
Step 1: Go to Settings > Apps or Applications.
Step 2: Select the app for which you want to configure permissions.
Step 3: Tap on Permissions to view and manage the app’s required and granted permissions.
Step 4: Toggle the permissions ON or OFF based on the desired access (e.g., camera, location, contacts).
Method 2: Granting permissions during app installation
When an app is installed for the first time, Android typically prompts users to grant or deny access to specific permissions. However, for enterprise environments, app developers can define “runtime permissions,” which only ask for permissions at the time of use (e.g., accessing the camera when opening the camera feature in an app).
Method 3: Granular Permissions with Scoped Storage and Permissions Groups
Android introduced scoped storage in newer versions (Android 10 and above) to limit apps’ access to files and directories outside their designated areas. This gives admins more control over the data an app can access:
- Scoped Storage: Apps are only allowed to access specific files and data (e.g., photos, videos) within their designated storage areas, ensuring other sensitive information remains inaccessible.
- Permissions Groups: Android groups similar permissions together (e.g., all location-based permissions, storage permissions, etc.), which simplifies configuration. Apps requesting access to one of the permissions within a group may automatically be granted access to all the permissions in that group.
Method 4: Enforcing permissions and configurations through Unified Endpoint Management (UEM) solution
A UEM solution offers administrators fine-grained control over app permissions, allowing them to configure settings remotely based on organizational policies. UEM enables:
- Granular control: Admins can specify which permissions apps receive, ensuring they only have the necessary access for functionality.
- Dynamic permissions: Permissions can be adjusted based on factors like user role, location, or device state, providing flexibility and security.
- Security compliance: UEM enforces policies to prevent apps from requesting high-risk permissions, reducing the potential for unauthorized access.
- Consistent policies: Permission settings are applied uniformly across all devices, ensuring compliance with corporate security standards.
So which method should I use?
While manual configuration through device settings, in-app permission prompts, and Android Management APIs offer basic control, each comes with limitations. Manual setup doesn’t scale across devices, runtime prompts rely on end-user action (which can be inconsistent), and APIs require technical overhead with limited flexibility for real-time policy enforcement.
In contrast, UEM provides centralized, scalable, and policy-driven control over app permissions—making it the most effective and reliable method for organizations managing multiple Android devices. It ensures consistent enforcement, minimizes user dependency, and aligns tightly with enterprise security and compliance goals.
How to set up app configurations and permissions on Android with Scalefusion UEM?
Step 1: Login to your Scalefusion dashboard.

Step 2: Enter the Two-factor authentication PIN you will receive on your registered email-id.

Step 3: A ‘Scalefusion Deep Dive’ window will be displayed. Navigate to Application Management.

Step 4: Click ‘Play for Work Apps’. Then click the ‘Publish’ button for the app you want to configure from the repository.

| Note: If your desired application is not in the repository, you can add it by click the ‘Add from Playstore’ button onto the top-right. |
Step 6: Navigate to ‘App Configs’ and click ‘+Create’ button.

Step 7. Provide a configuration name and configure the settings displayed. Click ‘Save’ on the bottom right of the ‘Managed configuration’ dialog box.

| Note: Please scroll down the dialog box to access further settings. |
This creates a new app configuration
Step 8: Click the three dots on the right of the created config log. Then click on ‘Publish’

Step 9: A ‘Publish App Configuration’ dialog box will appear. Select where you want to publish the config. Then click on the ‘Publish’ button on the top right.
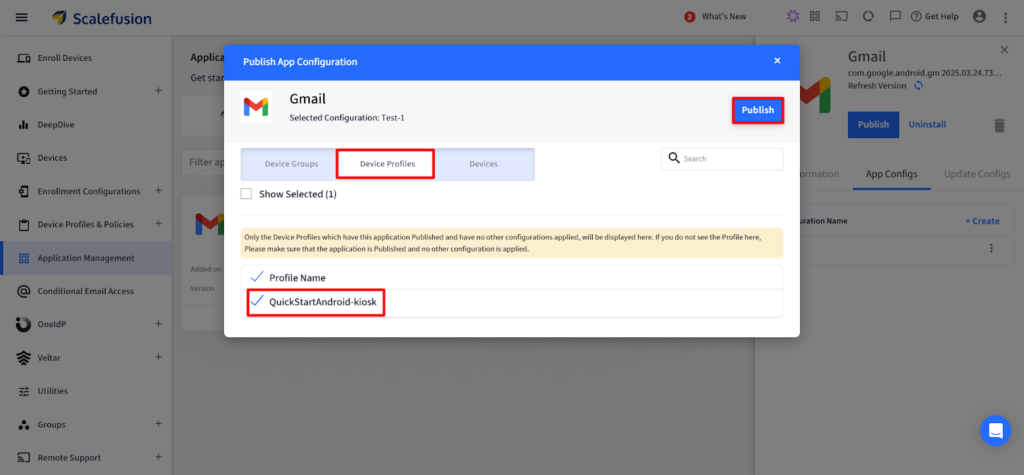
This publishes the configuration on the required device groups/profiles/devices.
| Note: Once the configurations are saved, they will reflect under App Configurations. |
Steps to set App Permissions
| Note: This can only be done on Android BYOD profile |
To create an Android BYOD profile follow the steps below:
Step 1: Login to your Scalefusion dashboard.
Step 2: Navigate to the ‘Device Profiles & Policies’ tab. Click on ‘Device Profiles’.
Step 3: Click on ‘Device Profiles’. Then click on ‘Create New Profile’.
Step 4: A ‘Create New Profile’ dialog box will appear. Now, select the profile mode to ‘Personal(BYOD)/WPCO(COPE)’. Enter a profile name and click on submit.
Note: Exit passcode is not available for BYOD mode.
Step 5. Navigate to Restrictions > Device Settings > General Settings.
Step 6. Turn on the toggle controls of the permissions you want to apply in the ‘Security’ and ‘Data Sharing’ sections.
Step 7: Click on the ‘Create Profile’ button on the top right of the screen.
This sets up the permissions for applications and creates a new Android BYOD profile.
Step 8: On the Device Profiles page, click on the ‘Apply’ button. Select the User Groups or Devices on which you want to apply the profile.
Why Scalefusion is your best bet for secure Android app management
Properly configuring app permissions and settings isn’t just a technical step—it’s foundational to security, compliance, and user trust. Native Android methods offer some flexibility but fall short on scalability and centralized control.
Scalefusion UEM bridges that gap with a unified dashboard, granular policy enforcement, and zero user dependency. From silent app deployment to real-time configuration management, Scalefusion simplifies Android app governance—so IT teams stay in control, and devices stay secure.
